

BLOG
Recommended on Houzz
Always an honor to be acknowledged for my work. I have received a Houzz Recommended badge.
Did you enjoy this article? I would love to hear your thoughts, so don’t be shy and comment below! Please don’t forget to subscribe to my RSS-feed or follow my feed on Twitter, Google+ and Facebook! If you enjoyed the following article we humbly ask you to comment, and help us spread the word! Or, if you would like, drop me an email.
Modern Townhouse Rendering
Modern living! It took me awhile to warm up to these modern building renderings that I have been illustrating, but I think I am liking them. I like the metals with the stone and the hard clean lines.
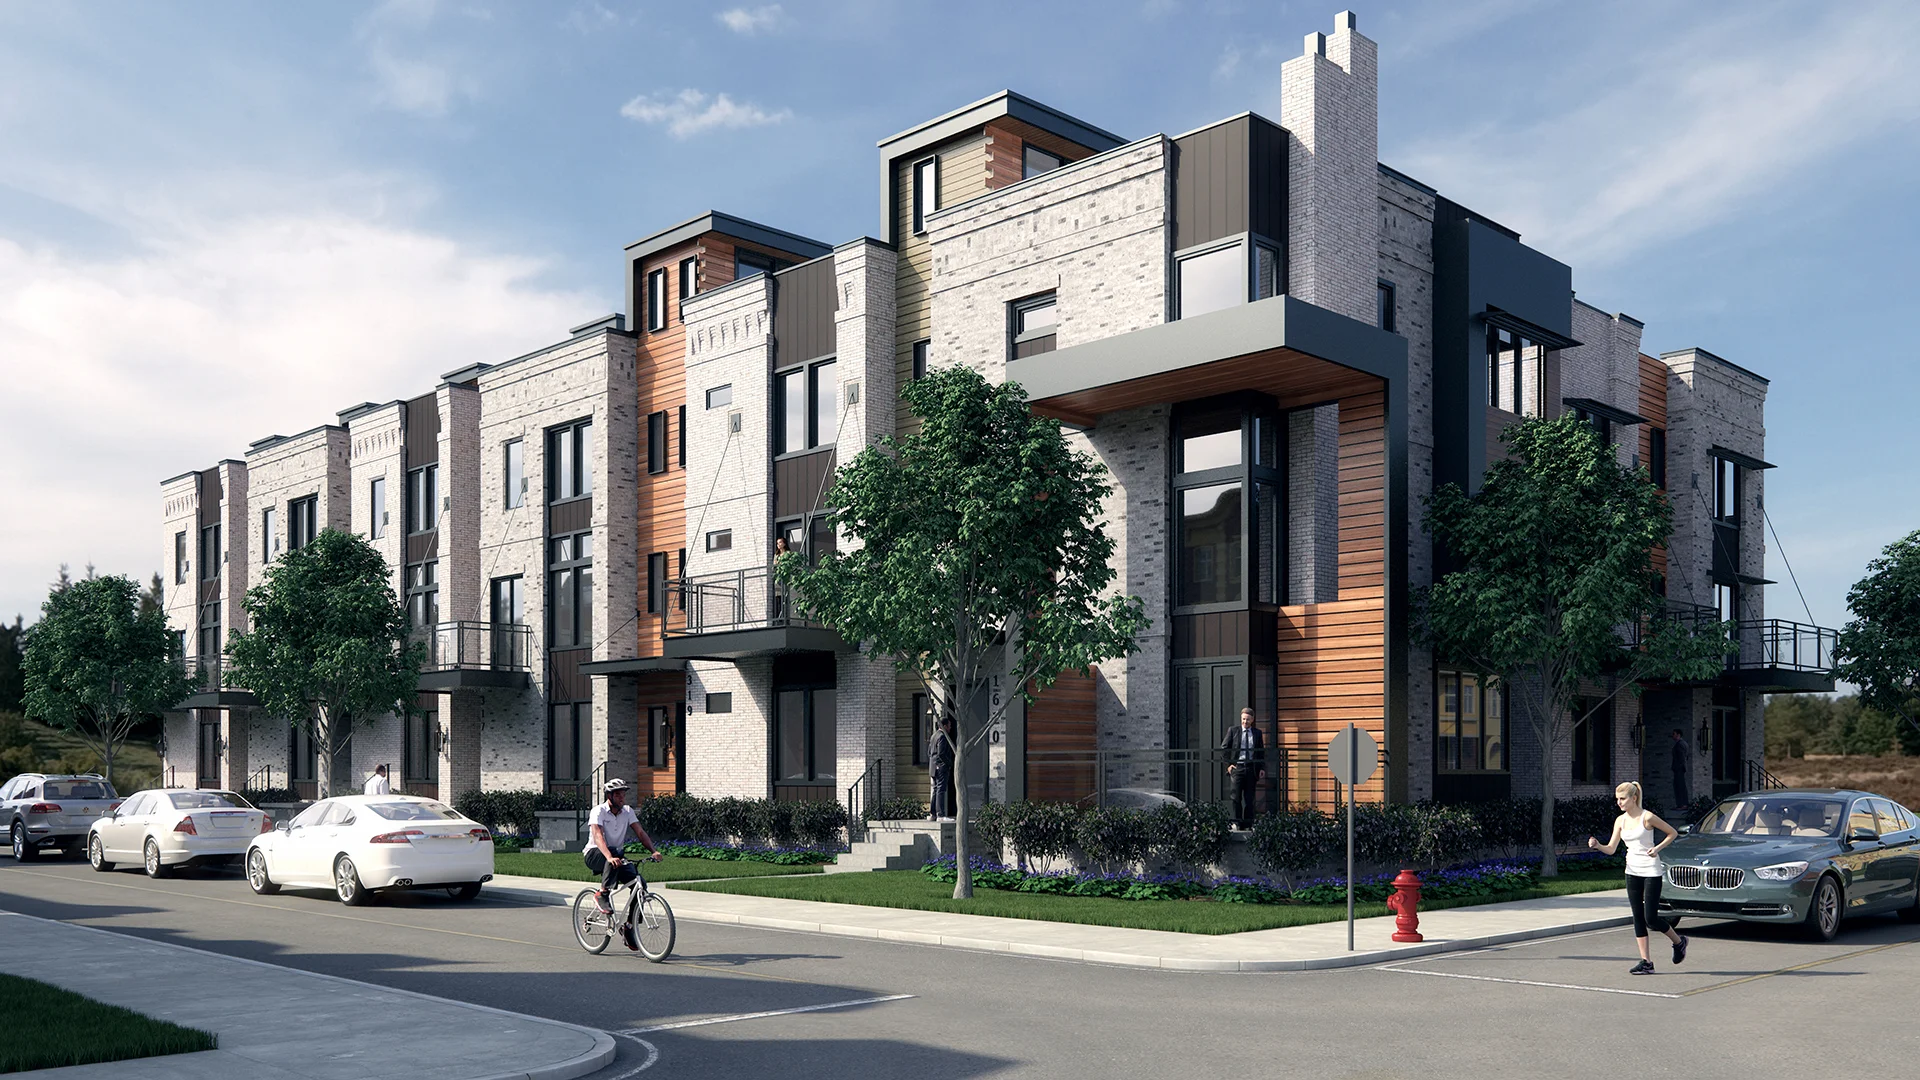
Modern Townhouse Rendering - Day
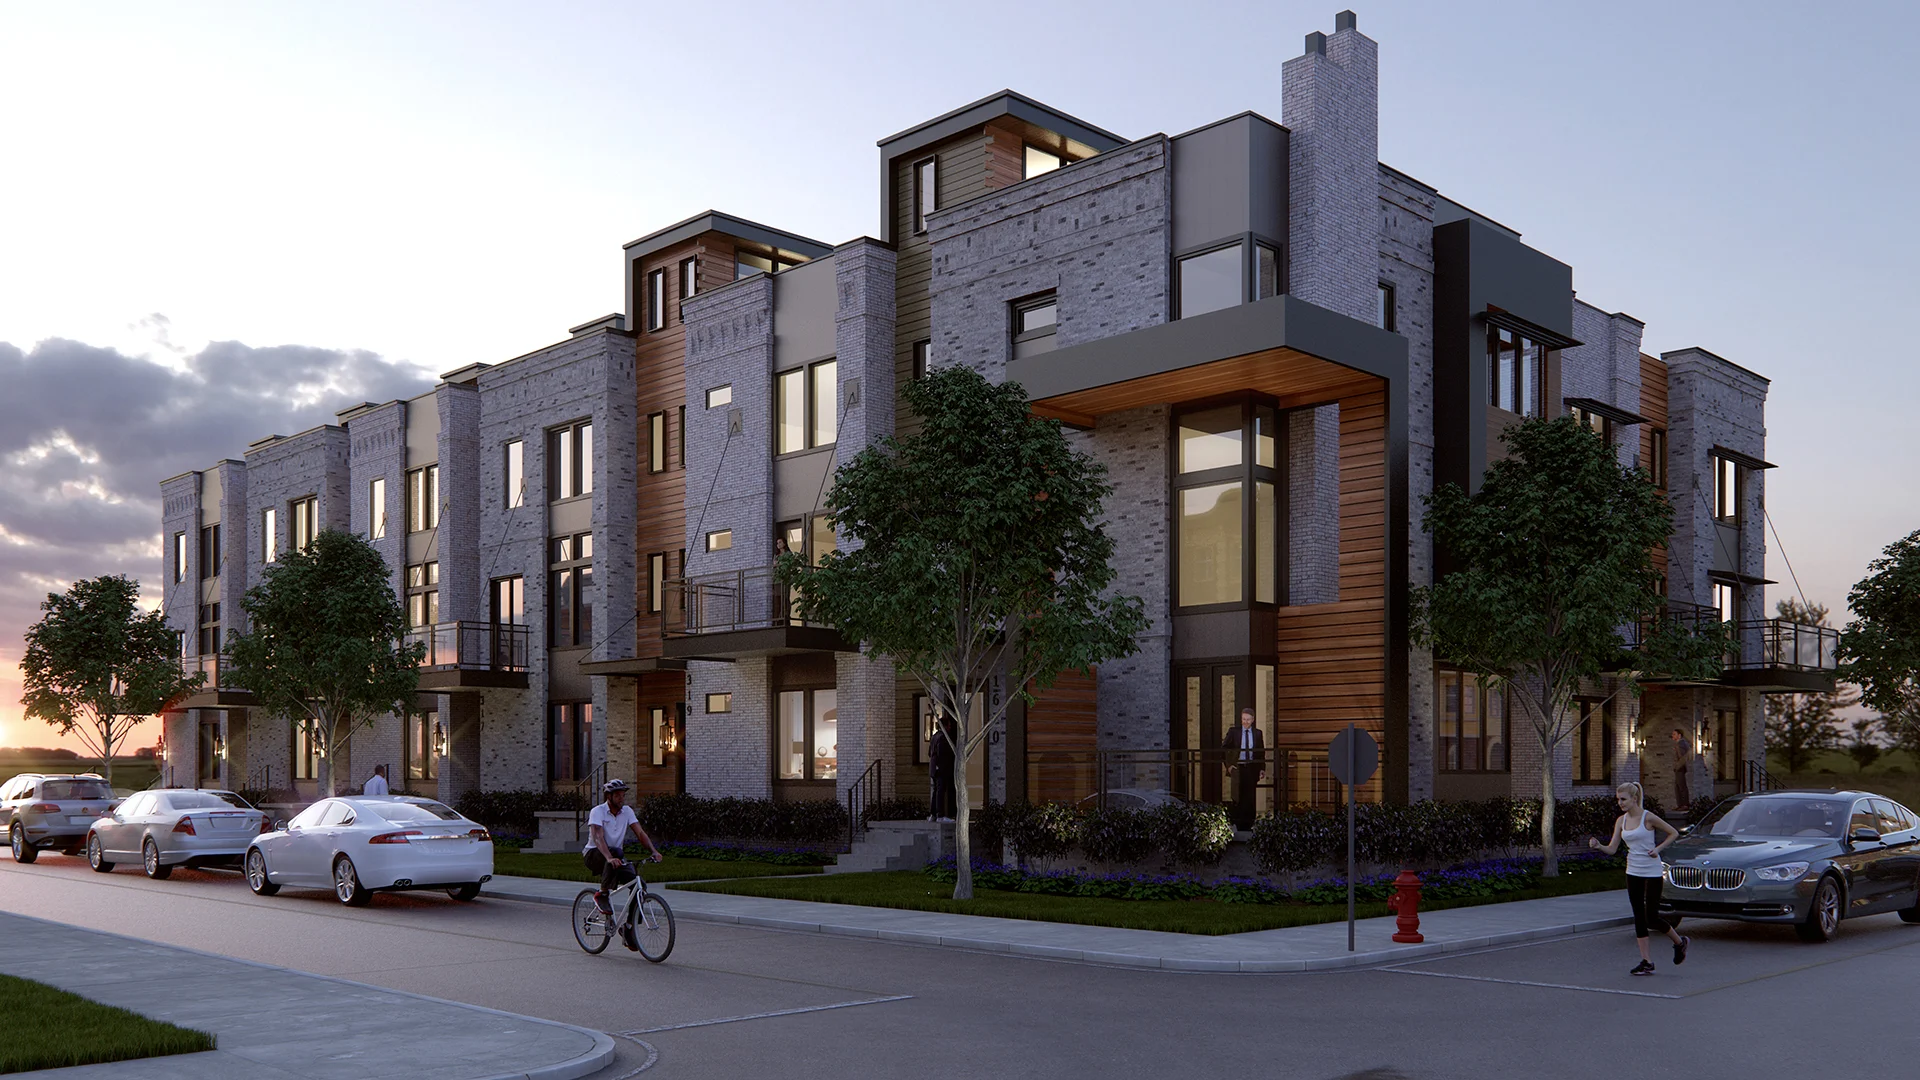
Modern Townhouse Rendering - Nigh
Did you enjoy this article? I would love to hear your thoughts, so don’t be shy and comment below! Please don’t forget to subscribe to my RSS-feed or follow my feed on Twitter, Google+ and Facebook! If you enjoyed the following article we humbly ask you to comment, and help us spread the word! Or, if you would like, drop me an email.
The Gramercy Architectural Rendering
I shared the project earlier last month, but the project was sold, so the new owner has made some changes in architecture prior to a press release.
“Those are incredible!!!!!!”

Modern Architecture Day Rendering

Modern Architecture Night Rendering
Did you enjoy this article? I would love to hear your thoughts, so don’t be shy and comment below! Please don’t forget to subscribe to my RSS-feed or follow my feed on Twitter, Google+ and Facebook! If you enjoyed the following article we humbly ask you to comment, and help us spread the word! Or, if you would like, drop me an email.
Commercial Architectural Rendering
“Bobby is extremely talented with his rendering abilities, very accommodating and quick turn around times.”
Quite a lot of architecture flows past my desk and I am not a fan of some, however, I really appreciate the proposed building for 220 Graham Ave., Eau Claire, WI.

220 Graham Ave Proposed Commercial Rendering
River Valley Architects approached me to prepare them a presentation rendering for a city council meeting. I received a solid Revit model, which is always nice, and a complete color board. Since the model wasn't built to illustrate, I had to spend a few days working the model into something I can use. I created many custom textures, which no repeating pattern can be seen, set up the lighting, and arrange the composition.
Since I had some good architecture to start with, the final architectural rendering turned out great. I wish the architect the best of luck and I hope to see it built.
Did you enjoy this article? I would love to hear your thoughts, so don’t be shy and comment below! Please don’t forget to subscribe to my RSS-feed or follow my feed on Twitter, Google+ and Facebook! If you enjoyed the following article we humbly ask you to comment, and help us spread the word! Or, if you would like, drop me an email.
See it Live: Autodesk 3ds Max 2016 Extension 1

Join Chris Murray as he takes you on a tour of 3ds Max 2016: See how new tools and new workflows help you get started quickly, work better, and collaborate like never before.
Did you enjoy this article? I would love to hear your thoughts, so don’t be shy and comment below! Please don’t forget to subscribe to my RSS-feed or follow my feed on Twitter, Google+ and Facebook! If you enjoyed the following article we humbly ask you to comment, and help us spread the word! Or, if you would like, drop me an email.
Custom Elder Care Interior Rendering
Definition of CUSTOM: adjective
made or done to order for a particular customer.
From the furniture, to the artwork, and the fabrics, everything were custom modeled and texture mapped to the interior designer's specifications.


After a couple iterations, here are the final renderings for a proposed elder care. The space is rather tall and I wanted to show the height of the space, so I chose this aspect ratio. With a subtle depth of field, and some warm lighting, I think the space turned out beautifully.
Did you enjoy this article? I would love to hear your thoughts, so don’t be shy and comment below! Please don’t forget to subscribe to my RSS-feed or follow my feed on Twitter, Google+ and Facebook! If you enjoyed the following article we humbly ask you to comment, and help us spread the word! Or, if you would like, drop me an email.
How to get your first high paying client (step by step)

Hey there guys and gals of the
If you got yesterday’s email, then you know I was blown away when I discovered that my designer friend was charging more money for 2 days of work than what I got for a full time position.
I was set up to try and create that for myself.
This email is not about telling another story, but rather explaining to you EXACTLY what I did to get my first client to pay me the same.
Pay attention, because these strategies can really make a difference in your freelance business:
The Meeting
There’s a lot of psychology going into meeting a potential client for the first time, much like
Here’s what I did:
I set the meeting on my own terms: I told them I can only meet on a certain day and time for 30 minutes, and mentioned the location where I can meet them. This created the impression that I was so busy and therefore probably very good and expensive.
I asked most of the questions: I did not let the client lead the meeting and interview me. I came prepared with a set of questions and I interviewed them. This is much more professional and creates the impression that I have to PICK THEM, rather than the other way around.
I told them I will get back to them: after I got everything I needed to know about the project, I did not tell them how much it would cost right away (even though they wanted to know), I just said: “let me think about it, and see what I can do for you”. Again: the ball is in my court.
The Proposal
The client was a startup that needed help designing their app.
I realized that if I gave them a proposal for the project they just asked for, I will probably lose 90% of the design work in this project, since all the work is going to happen AFTER the app actually launches.
Here’s what I did:
I created a project
gantt : I broke down the work into weeks so that I could show them how we’re going to meet their deadlines, and what’s going to happen each week. I did this for 12 weeks - the next 3 months.I created a retainer program: I told my client that I will charge them $5,000 a month, and that we can end the relationship at any time if we are not happy together. That means that for the entire project (total of 3 months) they will pay me $15,000.
I showed them what we can do next: I created an additional list of things I thought the startup could benefit from - new branding, a marketing video and a new website, among others. I showed them how we can fit some of them in before the launch, and as for the rest, we’ll continue working
on them should the first three months prove successful.
It took the client about 2 days to think this over (and
While other designer’s just gave them a price tag for the app design, I showed them how we can work together as a team, for the long term and I was invested in helping their company succeed. I showed them more than they’ve asked for and I helped them imagine what a great brand and design will do for their business.
Here are the key takeaways:
Negotiation starts before you even discuss money. If your client desperately wants to work with you because you are a superstar designer, they will be willing to pay. Present yourself as that superstar designer (without being a
douchebag of course.)Don’t give the client a proposal for what they asked for. A lot of times clients are not even sure what problem they are actually trying to solve. Do some thinking and then propose to them the best thing for their business. And guess what - the best thing for their business is in many cases to work with a designer on a regular basis.
Make it easy to say “YES!”. Your proposal needs to address your client’s fears and also to fulfill their dreams. It’s not only about the money - it’s about what that money buys.
I hope you think about this the next time you are about to meet a potential client.
There’s no reason why you won’t be able to make them happy with a proposal like this.
Now go kick some ass!
Ran.
PS
Yesterday I
Tennessee Luxury Townhome Rendering
This project went through an ownership change mid stream, however, I was able to complete the project for the new owners marketing team.
These luxury Townhome renderings are the third project that I completed for the same architect. Although I worked closely with the architect, the developer reached out to me to inquire about my services. After a few emails back and forth, and I believe a phone call, I was awarded my first project with the developer. The architect sent me his SketchUp model, which was created as a design model, and I took took it from there.
The architect, developer and I, worked back and forth for about a month. The process was mainly to work through some brick choices for the historical society. After about four color iterations, here is the final 3d renderings, showing the final design, which will be used to market the townhomes.

Day Townhouse 3D Rendering

Twilight Night Rendering

Did you enjoy this article? I would love to hear your thoughts, so don’t be shy and comment below! Please don’t forget to subscribe to my RSS-feed or follow my feed on Twitter, Google+ and Facebook! If you enjoyed the following article we humbly ask you to comment, and help us spread the word! Or, if you would like, drop me an email.
Lake Superior Cabin Renderings
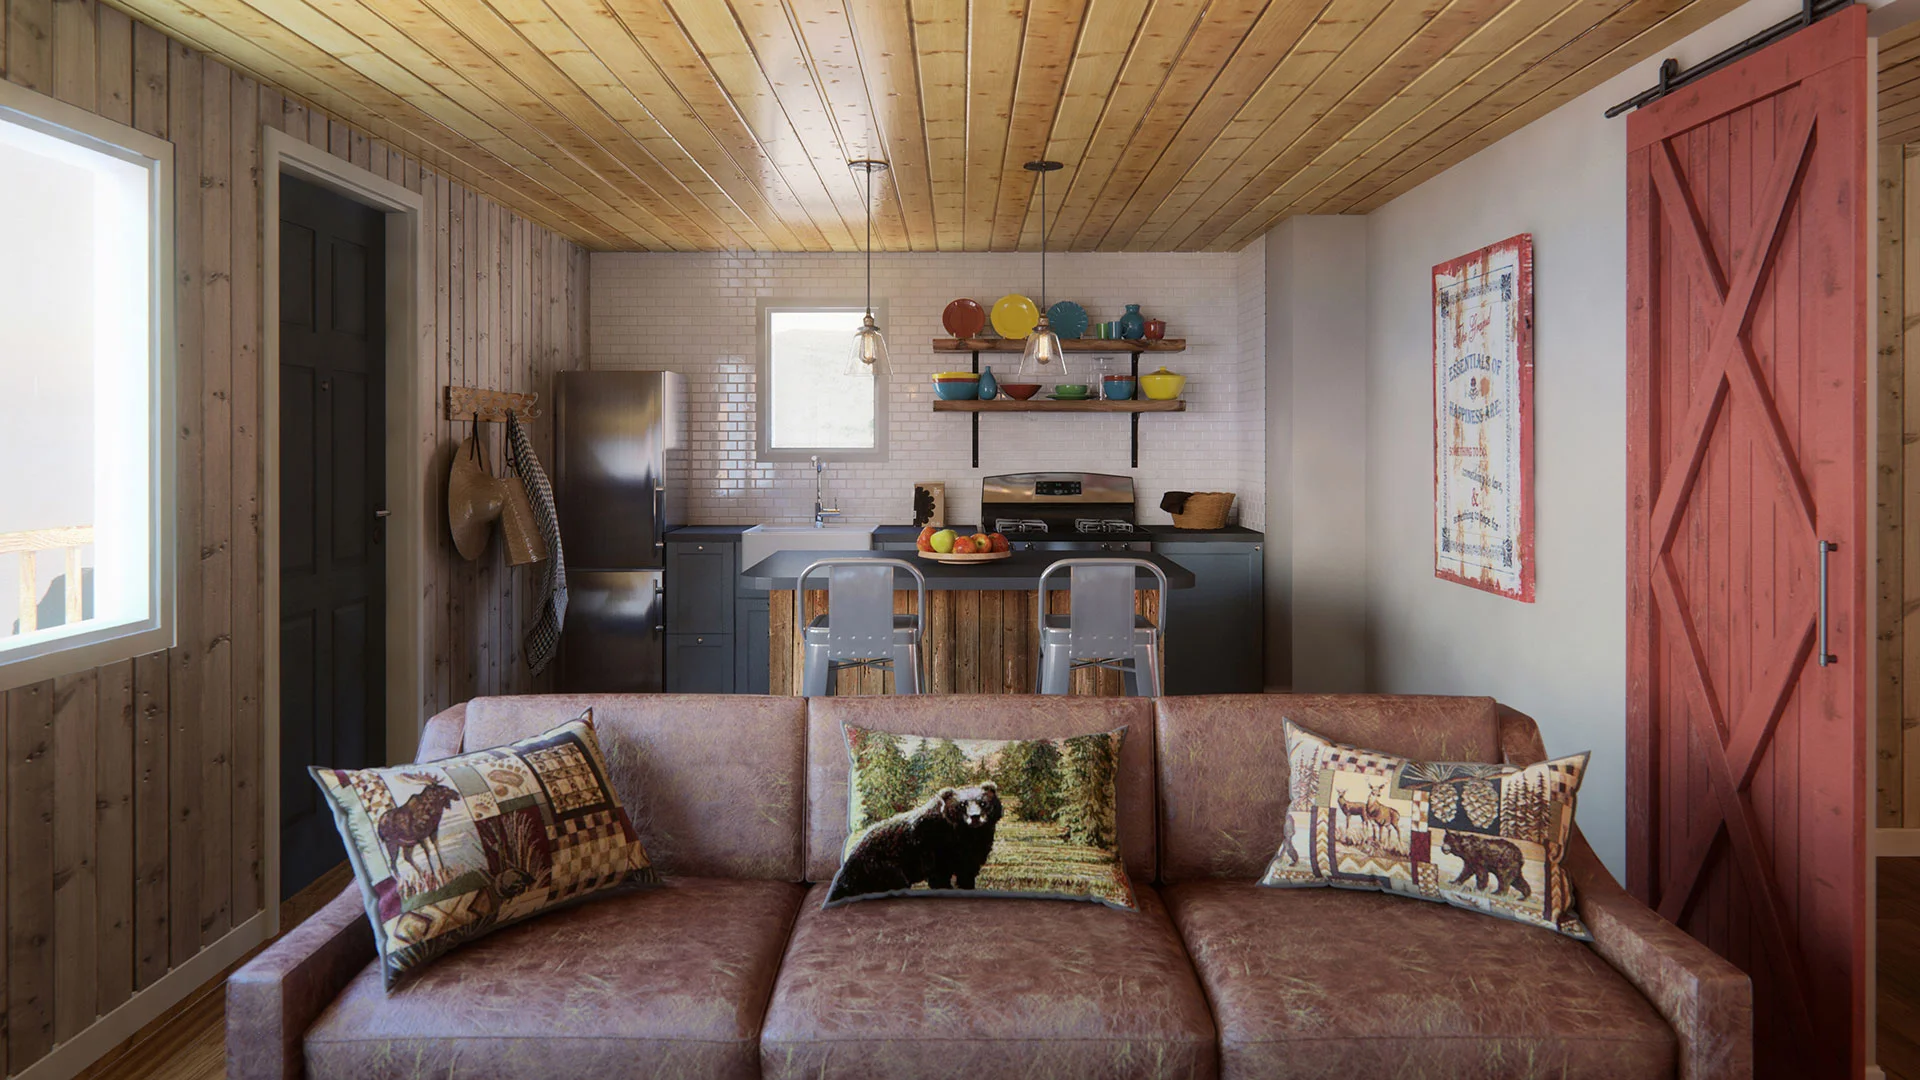
What a fun little architectural rendering project. I first got contacted by this builder several months ago. After nurturing the lead a little, their interior designer contacted me in regards to these little cabins that they'll be marketing. They loved my interior architectural rendering portfolio and wanted to commission me to work on their project.
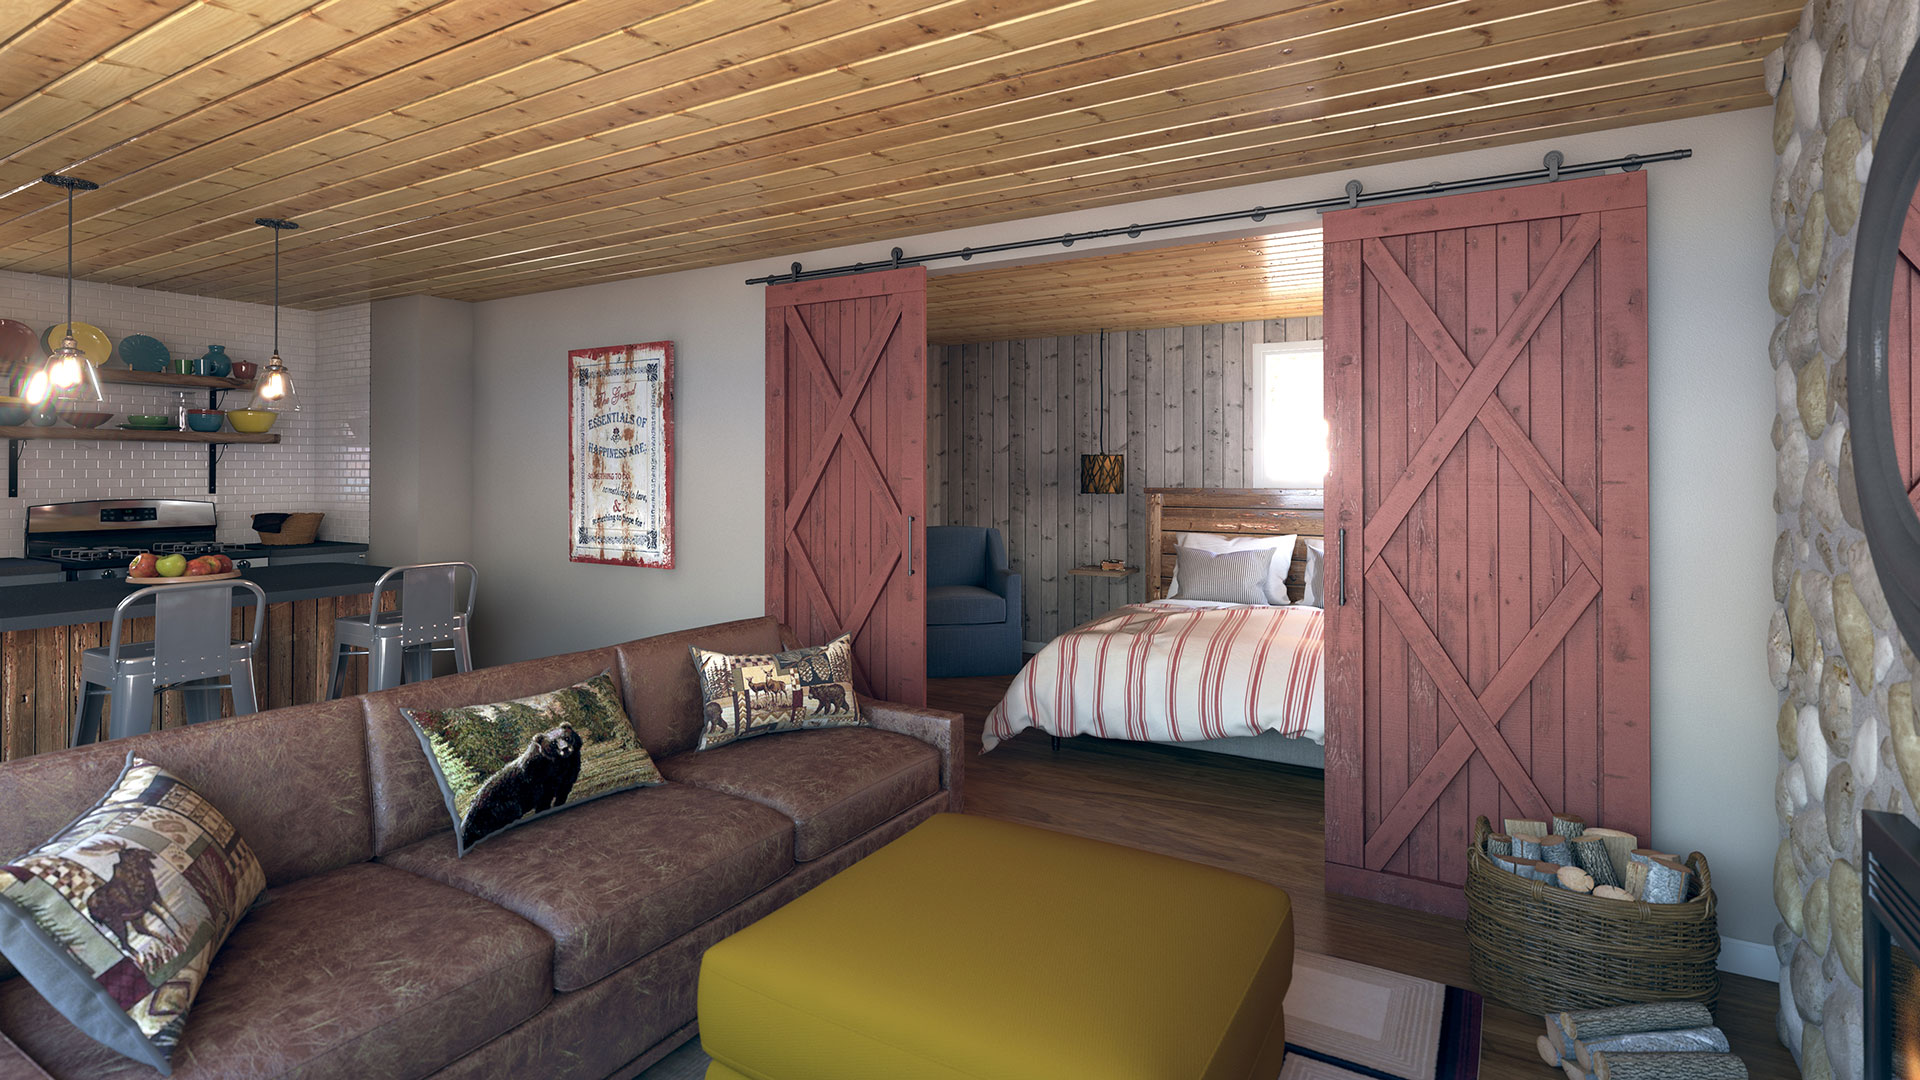
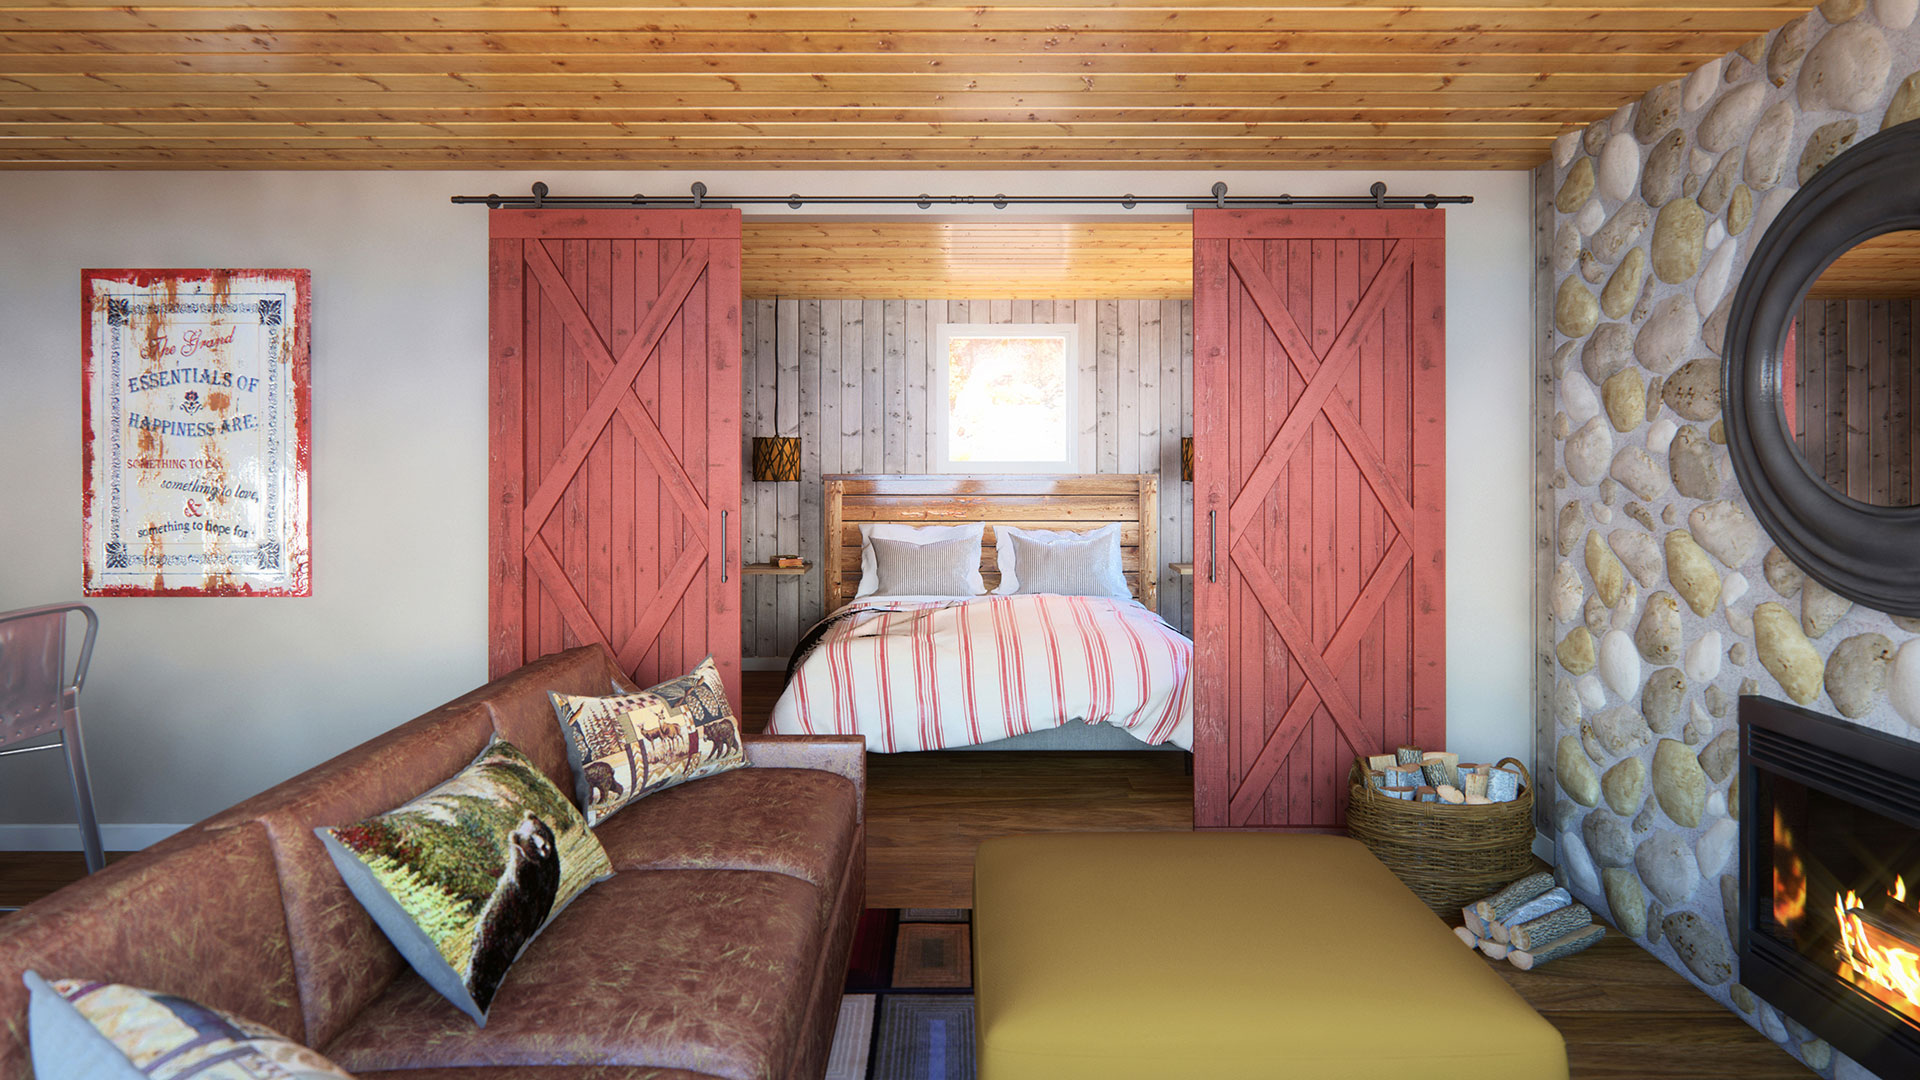


Of course, I accepted and after a few iterations, these are how they turned out. I hope you enjoy them. If you have any questions or comments, feel free to reach out to me by commenting on this post, or emailing me.
Did you enjoy this article? I would love to hear your thoughts, so don’t be shy and comment below! Please don’t forget to subscribe to my RSS-feed or follow my feed on Twitter, Google+ and Facebook! If you enjoyed the following article we humbly ask you to comment, and help us spread the word! Or, if you would like, drop me an email.
Favourite settings for V-Ray 3.x

Here, is a video that Vladimir Koylazov share of his favorite V-Ray 3.x features. In my opinion, he really simplifies the workflow, and it's worth your time to watch.
Did you enjoy this article? I would love to hear your thoughts, so don’t be shy and comment below! Please don’t forget to subscribe to my RSS-feed or follow my feed on Twitter, Google+ and Facebook! If you enjoyed the following article we humbly ask you to comment, and help us spread the word! Or, if you would like, drop me an email.
Contacts Journal CRM
Powerful relationship management, for your business and professional contacts
Contacts Journal is the leading CRM app for iPhone, iPad and Mac that lets you keep person-by-person records of past conversations, create follow-ups for upcoming meetings, attach important documents and record essential data with customizable fields
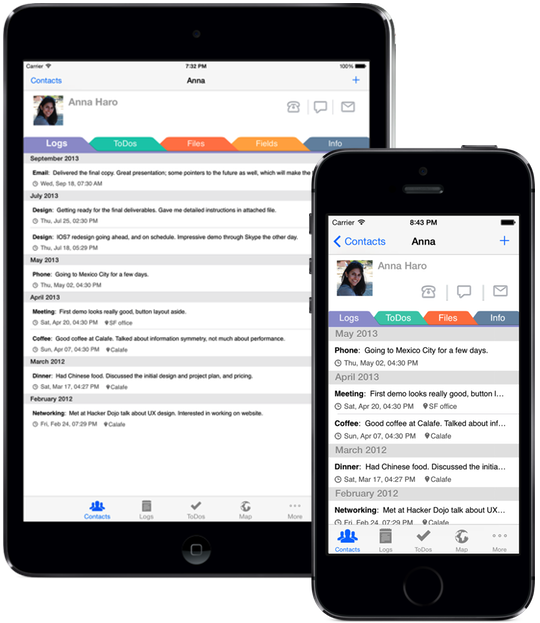
- Create Meeting Logs
- Build your relationship history by keeping notes for future reference
- Save Documents
- Attach document files with your contacts; view them on the road or in an important meeting!
- Syncs with
iCloud - Automatic, seamless syncing between iPhone, iPad and Mac using
iCloud - Optimized for Mobility
- See all your contacts' addresses on Map View; quickly access local clients' information. Also tag Logs and
ToDos with Location data - Schedule Follow-ups
- Create a
ToDo list for each contact, featuring alerts, links to Calendar app, recurring tasks - Customizable User Fields
- Define your own important Fields; save custom data for each of your contacts
- Integrated with Address Book
- Import and sync with existing contacts from your Address Book easily. Save contacts privately as well
- Cross-vertical
- Works great for all types of professionals: sales, client management, lawyers, freelancers, teachers, and more
Did you enjoy this article? I would love to hear your thoughts, so don’t be shy and comment below! Please don’t forget to subscribe to my RSS-feed or follow my feed on Twitter, Google+ and Facebook! If you enjoyed the following article we humbly ask you to comment, and help us spread the word! Or, if you would like, drop me an email.
End of Perpetual Licenses Sales, including 3DS MAX

End of Sales of New Individual Perpetual Licenses
End of Sales of New Individual Perpetual Licenses
Dear Autodesk Customer,
You are receiving this message because our records indicate that you or your organization may be impacted by the following business change. This notice is intended to provide you sufficient time to understand the options, evaluate your needs, and take any required action before the change becomes effective.
Autodesk is transitioning from perpetual software licenses to subscription-based options. After Januar 3
You will, however, be able to continue using your existing perpetual licenses. For your software that is on Maintenance Subscription, you will retain access to your benefits and stay up-to-date by keeping your Maintenance Subscription current.
Products impacted by this change include AutoCAD®, AutoCAD LT®, and 3ds Max®;
To learn more about this licensing change, contact your local Autodesk Authorized Reseller
You can also submit your questions via the Perpetual License Transition Forum to get an answer from our experts.
To find out more about Subscription options, visit our Subscription page today or contact your reseller.
Yours sincerely,
Jeff Wright
Did you enjoy this article? I would love to hear your thoughts, so don’t be shy and comment below! Please don’t forget to subscribe to my RSS-feed or follow my feed on Twitter, Google+ and Facebook! If you enjoyed the following article we humbly ask you to comment, and help us spread the word! Or, if you would like, drop me an email.
Elder Care Interior Rendering
On this project, the client wanted several rooms illustrated, but unfortunately, their budget only allowed for one space. Here, is the space that they decided on, which is the dining room looking towards the bistro.
Elder Care Interior Rendering
Did you enjoy this article? I would love to hear your thoughts, so don’t be shy and comment below! Please don’t forget to subscribe to my RSS-feed or follow my feed on Twitter, Google+ and Facebook! If you enjoyed the following article we humbly ask you to comment, and help us spread the word! Or, if you would like, drop me an email.
Mid-Rise Architectural Rendering
Here, is a mid rise architectural rendering that I just completed for © Z Feng Architect & Company.
© Z Feng Architect & Company.
When working with architect, Z Feng, he is always very cautious about rushing the process. Every job starts with a short brief, he sends me the CAD plans, and he sits back in anticipation for the final illustration. Z Feng likes drama and excitement for his renderings and hopefully, at least it's my goal, he is never disappointed. It's rare to work with someone who continually tells me to "take your time, do not rush, and I look forward to what you do"
Did you enjoy this article? I would love to hear your thoughts, so don’t be shy and comment below! Please don’t forget to subscribe to my RSS-feed or follow my feed on Twitter, Google+ and Facebook! If you enjoyed the following article we humbly ask you to comment, and help us spread the word! Or, if you would like, drop me an email.
.
Autodesk Media & Entertainment Feature

Do what you love, love what you do. Then tell us why. http://autode.sk/MillionStories #adskmillionstories
Posted by Autodesk Media & Entertainment on Tuesday, June 9, 2015
Thanks, Autodesk, for featuring me on your Million Stories video. It is an honor and a privilege to have been chosen!
Did you enjoy this article? I would love to hear your thoughts, so don’t be shy and comment below! Please don’t forget to subscribe to my RSS-feed or follow my feed on Twitter, Google+ and Facebook! If you enjoyed the following article we humbly ask you to comment, and help us spread the word! Or, if you would like, drop me an email.
Chapman House Rendering
The other day I received a call, from a real estate agent. The agent saw the work I did on the Nelson House Rendering, which was for another real estate agent at another firm, and also a good friend of hers. When she inquired about the 3D artist who illustrated the house, her friend said:
“He’s my secrete weapon, I can’t give you his information!”
During the conversation she noticed my watermark, left her visit, and with a quick web search found me on-line. Here is the Chapman house.
Chapman House Rendering
Chapman House Rendering
Did you enjoy this article? I would love to hear your thoughts, so don’t be shy and comment below! Please don’t forget to subscribe to my RSS-feed or follow my feed on Twitter, Google+ and Facebook! If you enjoyed the following article we humbly ask you to comment, and help us spread the word! Or, if you would like, drop me an email.
The 31 Orange House Rendering
Great client and great design. Here, the real estate broker commissioned me to illustrate this property for advertisement.
Architectural Photorealisitc Rendering
Architectural Photorealisitc Rendering
Did you enjoy this article? I would love to hear your thoughts, so don’t be shy and comment below! Please don’t forget to subscribe to my RSS-feed or follow my feed on Twitter, Google+ and Facebook! If you enjoyed the following article we humbly ask you to comment, and help us spread the word! Or, if you would like, drop me an email.
Osprey Estate - Eaton
I am proud to share some of my latest 3D photorealistic architectural renderings. A lot of long days and many sleepless nights, but oh so worth it. Several months ago I was asked to illustrate a new development, which is being built in Florida. Once I saw the plans I was excited to get started. Please, use the arrows to scroll through the rooms.
First, I got right to modeling the exterior and all the interior spaces, using 3DS MAX Design; the developer decided on five interiors. The plans were simple floor plans, without elevations or details, so that was a bit of a challenge. However, working back and forth with the developer, we worked through the design.
The Osprey Estate development will consist of four houses, this being the first of the four. Please, visit The Angela Architectural Renderings. I'll post the other two when they are complete. Also, each house will have an exterior, which I'll update all posts with the exterior architectural renderings.
As previously mentions, I used 3Ds MAX Design to model, and for the rest of the technical mumbo jumbo, I used V-Ray as the render engine, and Photoshop for post production.
Did you enjoy this article? I would love to hear your thoughts, so don’t be shy and comment below! Please don’t forget to subscribe to my RSS-feed or follow my feed on Twitter, Google+ and Facebook! If you enjoyed the following article we humbly ask you to comment, and help us spread the word! Or, if you would like, drop me an email.
Osprey Estate - Angela
I am proud to share some of my latest 3D
First, I got right to modeling the exterior and all the interior spaces, using 3DS MAX Design; the developer decided on five interiors. The plans were simple floor plans, without elevations or details, so that was a bit of a challenge. However, working back and forth with the developer, we worked through the design.
The Osprey Estate development will consist of four houses, this being the first of the four. Please, visit The Eaton Architectural Renderings. I'll post the other two when they are complete. Also, each house will have an exterior, which I'll update all posts with the exterior architectural renderings.
As previously mentions, I used 3Ds MAX Design to model, and for the rest of the technical mumbo jumbo, I used V-Ray as the render engine, and Photoshop for post production.
Did you enjoy this article? I would love to hear your thoughts, so don’t be shy and comment below! Please don’t forget to subscribe to my RSS-feed or follow my feed on Twitter, Google+ and Facebook! If you enjoyed the following article we humbly ask you to comment, and help us spread the word! Or, if you would like, drop me an email.
The Ultimate Guide to Tonemapping

The Ultimate Guide to Tonemapping
A comprehensive tutorial showing all of the best options currently available for tonemapping your renders in post. All of the best programs are covered in detail, from Photoshop to Fusion and Nuke, as well as some specialised options such as Photomatix and Picturenaut.
The advent of Nuke non-commercial and the free version of Fusion means that
Whatever render engine you use, you can make a substantial difference to your renders, whether stills or footage, by tonemapping in post. To find out how, watch the trailer here.
Did you enjoy this article? I would love to hear your thoughts, so don’t be shy and comment below! Please don’t forget to subscribe to my RSS-feed or follow my feed on Twitter, Google+ and Facebook! If you enjoyed the following article we humbly ask you to comment, and help us spread the word! Or, if you would like, drop me an email.