

BLOG
5 Ways To Increase Your Value To Your Client

5 Ways To Increase Your Value To Your Client
Most of us, designers, assume our client cares only about the quality of our design work. While it’s true that he cares how awesome our design is, the client also cares about other things.
Here are 5 things your client cares about, and how to increase your value to him. Nail these, and you’ll be able to charge more for your work.
Did you enjoy this article? I would love to hear your thoughts, so don’t be shy and comment below! Please don’t forget to subscribe to my RSS-feed or follow my feed on Twitter, Google+ and Facebook! If you enjoyed the following article we humbly ask you to comment, and help us spread the word! Or, if you would like, drop me an email.
Freelance Hourly Rate Calculator
Freelance Hourly Rate Calculator
A simple calculator to help you find out how much to charge as a freelancer.

How This Calculator Works
The Freelance Hourly Rate Calculator will help you determine what you need in order to support the lifestyle that you desire.
By entering information into each field, you can calculate an hourly rate based on your costs, number of billable hours, and desired annual profit.
Section One asks about your desired lifestyle. This includes how much profit you would like to make annually, how many hours a day you will be working, and how many days a week will be on your schedule.
Section Two asks about your daily and monthly personal expenses. This includes rent/mortgage, and occasional expenses.
Section Three asks about your monthly business and logistical expenses. This includes office rental fees, software subscriptions and communication costs.
Based on this information, you will be given your minimum necessary hourly rate, and total annual salary. Try it out, and see what it will take to live the lifestyle of your dreams!
Charging for Freelance Work
Here at Motiv, we believe that your preferred lifestyle should be the number one factor in selecting your rate, and settling on your annual salary as a freelancer. This tool will assist you in finding this information. All it takes is a little planning on your part.
Take a mental snapshot of the way you want your life to look in a year, five years and ten years.
Once you have a clear idea of your coming goals, you can begin to fill in the blanks.
The calculator is going to factor all of this information in your final result. Knowing what goals you hope to reach will give you the blueprint you need to work the way you want to.
Your dream lifestyle is within reach!
Did you enjoy this article? I would love to hear your thoughts, so don’t be shy and comment below! Please don’t forget to subscribe to my RSS-feed or follow my feed on Twitter, Google+ and Facebook! If you enjoyed the following article we humbly ask you to comment, and help us spread the word! Or, if you would like, drop me an email.
How Much Should I Charge?

A potential client wants a proposal for a design project? Awesome. Answer 5 questions, and know how much to charge to make this project profitable.
Freelance designers are victims of a haphazard pricing structure—without set industry guidelines, designers must rely on past project pricing, colleague recommendation, or generic pricing lists to conjure a “fair” price for the work. Prices are difficult to match to inflation or utility costs, and little consideration is given to the relationship between designer and client.
Aiming to simplify this ambiguous pricing model, learning platformnuSchool developed “How Much Should I Charge?,” a web tool that suggests a freelance base rate and negotiation window, dependent on a designer’s salary goals, costs, and enjoyment of the project.

Did you enjoy this article? I would love to hear your thoughts, so don’t be shy and comment below! Please don’t forget to subscribe to my RSS-feed or follow my feed on Twitter, Google+ and Facebook! If you enjoyed the following article we humbly ask you to comment, and help us spread the word! Or, if you would like, drop me an email.
Self Promo Video for Autodesk Write-Up
Here is a little promo video Autodesk requested of me. I'll be featured on an Autodesk website, soon.
Autodesk is a world leader in 3D design software for entertainment, natural resources, manufacturing, engineering, construction, and civil infrastructure.
Did you enjoy this article? I would love to hear your thoughts, so don’t be shy and comment below! Please don’t forget to subscribe to my RSS-feed or follow my feed on Twitter, Google+ and Facebook! If you enjoyed the following article we humbly ask you to comment, and help us spread the word! Or, if you would like, drop me an email.
The Carriage House Renderings
Owner/Designer at Freedom Design, Michelle Marriott, asked me to illustrate her Carriage House. Freedom Design is a firm located in Woods Cross, Utah. I have created several architectural renderings for Michelle, and I have to say, she is one of my favorite clients.

Pool side of the Carriage House Architectural Rendering

Driveway side of the Carriage House Architectural Rendering
The Carriage House is part of the Mountain Retreat series of Architectural Renderings.
Did you enjoy this article? I would love to hear your thoughts, so don’t be shy and comment below! Please don’t forget to subscribe to my RSS-feed or follow my feed on Twitter, Google+ and Facebook! If you enjoyed the following article we humbly ask you to comment, and help us spread the word! Or, if you would like, drop me an email.
What Do I Charge for 3D Design Changes?
I am pretty relaxed with the changes, but after a point I'll bring it to my client's attention. I am more concerned about producing a product that my client loves and the relationship that might come from the project.
At the start of any project I try to ask pertinent questions with my project survey. My project survey is short, simple, and effective. Spending a few minutes at the beginning can save hours later.
After the initial 3d model is complete, I send a gray scale for approval on the modeling. Sometimes, the 3d model is the first time they really see their project, and it initiates design change, which I enjoy being part of that process.

Gray Scale 3d Models
The gray scale model serves several purposes. First, and foremost, it allows the client to see their project for the first time. Sometimes, more times than not, it's not what they were expecting. Or, it's the Architect's or Designer's client who is surprised. At the gray scale stage, I allow changes as long as they are not extensive. However, I could justify the extra charge at this stage, considering what it would cost to make these changes with a sledgehammer.
Also, at the gray scale stage, you'll be able to see the camera view and lighting scheme. The view and lighting, other than the design, is the most important part of any architectural illustration. Composition is key!

After the client approves the grayscale renderings, and any changes are made, I move on to the color (texture and materials). Like the view and lighting, textures and materials are important, too. Here, I can spend 1/3 of my allocated time building proper textures and materials. It takes a lot of work to avoid the awful tiling you see in less well-executed architectural renderings. At the beginning of any project, I request color samples. A large wall with small stone might take me a few hours to create when a painted concrete wall might take a few minutes. Having said that, a concrete wall that turns into a rock wall later in the design might occur an hourly charge. At the least, I'll make my client aware of the extra time it'll take so they might have to deal with a delayed deadline.
Render times can be extensive, so after things are colored I'll send a lower resolution color proof. The resolution is high enough to see detail, but low enough to avoid long rendering times. Once the lower resolution is approved I'll fine tune settings, for a clean render, and render the final output. If last minute changes are made, after the lower resolution rendering has been approved and the deadline is looming, I might need to use a render farm service. Render farm services come at a cost, a cost that I'll have to pass on to my client.
Final renderings can take from 2 hours per still all the way up to 6 hours per still. I am very sensitive to my client's deadlines, and I'll try to do what it takes to meet them, but last minute changes might need to be curbed. I have, and I will continue to, pull all-nighters to meet deadlines, but I try to avoid them. If the looming deadline is in jeopardy because of my doing, I will pull all-nighters.
Please, if you have other questions, feel free to comment on this thread or email me with your questions.
Did you enjoy this article? I would love to hear your thoughts, so don’t be shy and comment below! Please don’t forget to subscribe to my RSS-feed or follow my feed on Twitter, Google+ and Facebook! If you enjoyed the following article we humbly ask you to comment, and help us spread the word! Or, if you would like, drop me an email.
Adobe Photoshop CC 2014.2

Photoshop CC 2014.2 update
The Photoshop CC 2014.2 update has arrived. Check out new features.
New Doc Presets, New Guide Layouts, Layouts based on a shape, Smarter smart guides, Overscrolling preference, Creative Cloud libraries, and Extract.
- Creative Cloud Libraries - This new addition to the Creative Cloud will allow you to download graphics from the Adobe Market and have them available to inside both Illustrator and Photoshop. The Libraries panel also allows you to add fonts, graphics, PSD’s, colours etc all within the Photoshop and Illustrators. Any content here will be synced automatically to your Creative Cloud storage area. This feature is a wonderful enhancement if you have ever wanted to have a global set of favourites to your workflow. Of course you can create new libraries at any time to organise your content based on your preference
- New Welcome screen - Have you ever wanted to learn new features and techniques straight from within Photoshop? The new welcome screen will present videos to you based on the activities and features that you use.
- Extract Assets - There is a new menu option called Extract Assets, this option is available under the File menu. The primary use for Extract is to pull assets from the PSD comp, especially usefull for Web designers.
- Improved Guides - The new guides feature enables new guides to be created from existing shapes on the canvas, or the ability to create new guides from a template that can be designed on the fly. New Guides Layout is available from the View menu option.
- Windows Touch - The experimental touch features have now moved into the main line and will be enabled for touch based systems. This includes the Microsoft Surface Pro 3.
- 3D Printing - Photoshop now has the ability to read COLLADA rigged and animation data. This feature is available on the timeline, it allows you to pose the model at a certain point, then print it. This feature will be covered in more detailed in a later post.
- 3D PDF - Photoshop CC also supports the option to export 3D PDF’s. The Export 3D PDF option is available from the 3D menu. Selecting this option will output a PDF with all of the 3D PDF controls enabled.
- Scripted Patterns - Scripted patterns have been moved to the Filter menu (Filter / Render / ). The different options have the same names as before Flame, Tree and Picture Frame.
- The Flame option is a new addition and allows you to create a flame on a path or multiple paths.
- Improved display of Properties panel for Live Shapes
- Added transparency support for copy/paste from Photoshop to other applications (Mac only)
- New edge padding option for Select > Modify commands. This option allows you to choose if the selection modification will go outside of the canvas edge or not. There is now a check box controller on each of the participating options under the Select /Modify option. The check box is turned off by default.
- Adobe Color panel (formerly Kuler) is now included with the shipping version
- Size of the Preferences, Keyboard Shortcuts and Menus dialogs have been adjusted to fit wide-screens
Did you enjoy this article? I would love to hear your thoughts, so don’t be shy and comment below! Please don’t forget to subscribe to my RSS-feed or follow my feed on Twitter, Google+ and Facebook! If you enjoyed the following article we humbly ask you to comment, and help us spread the word! Or, if you would like, drop me an email.
Sharp Enlargements Renderings at Any Size
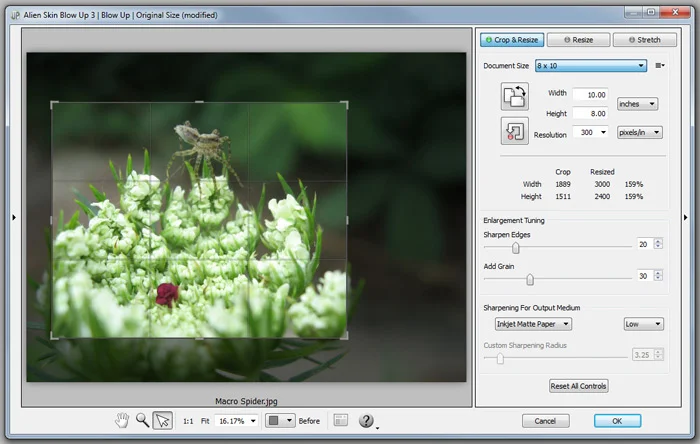
Blow Up keeps renderings crystal clear during enlargement. Especially in large prints hung on a wall, the difference between Blow Up and Photoshop is astounding. Version 3 makes renderings even sharper without computer artifacts.
If you understand Photoshop’s resize command, then you already know how to use Blow Up. Our large library of standard paper sizes makes it even easier. With Lightroom and CMYK support, Blow Up fits into a professional workflow.
Did you enjoy this article? I would love to hear your thoughts, so don’t be shy and comment below! Please don’t forget to subscribe to my RSS-feed or follow my feed on Twitter, Google+ and Facebook! If you enjoyed the following article we humbly ask you to comment, and help us spread the word! Or, if you would like, drop me an email.
Getting the Color Average
One of the most difficult parts of any architectural rendering is getting the colors correct. Typically, I receive a swatch, photo, or a web link. Now, people tend to see things as they remember them being. Our brains have a way to filter things out. For example, white snow is actually bluish, due to the sky, but our brains filter out the blue and shows us white because snow is white after all.

When I receive a color sample I crop out everything that isn't part of the material and I take an average sample. If I want snow to look real, I can't just apply a white material, because the snow isn't white; I have to create a bluish material.
In Photoshop go to Filter, Blur and select Average

Blur Average
Now, I can use Photoshop's Color Picker to get the average color and build my material from there.
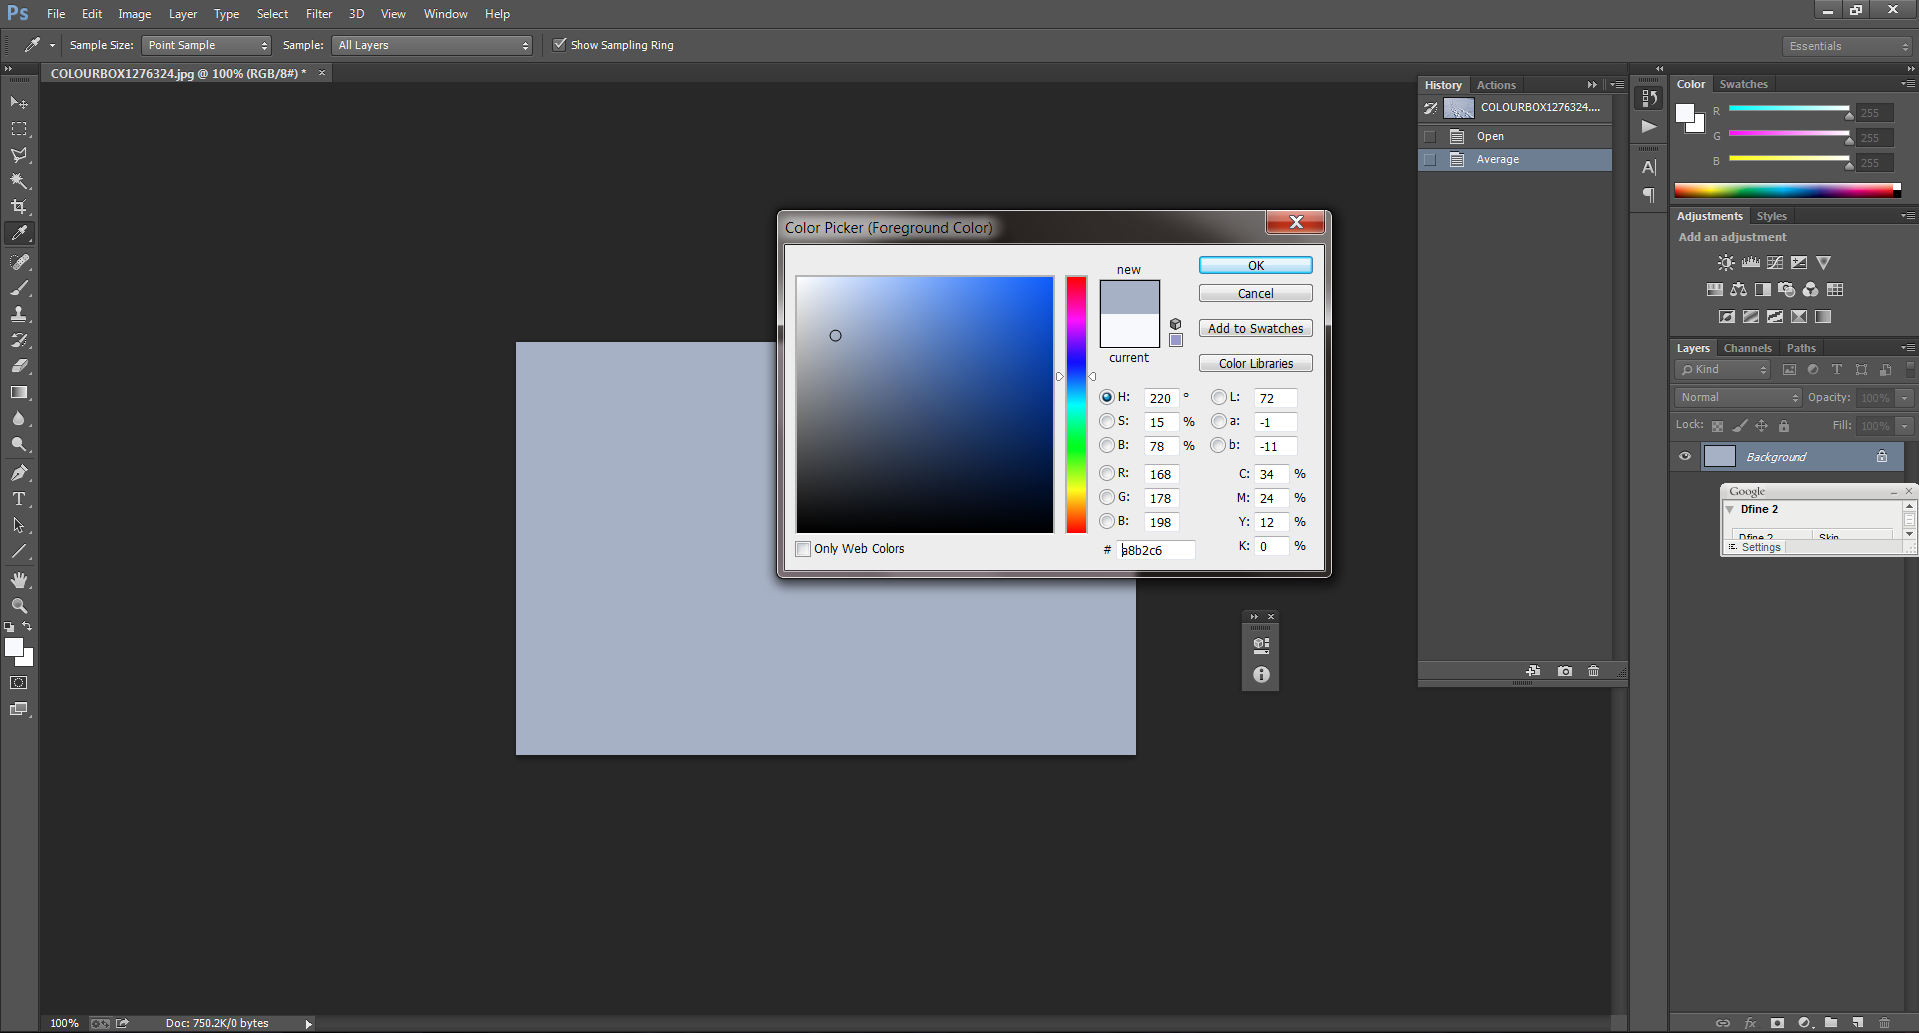
Photoshop Color Picker
I hope this helps you when you are creating your materials from a sample. If anything, you can show your client the actual color and not the color they think the sample is. I have had clients insist that a color is one thing, when in fact it is something totally different.
A photorealistic architectural rendering is only successful when you successfully recreate a reality. If you would like your snow scene to look real you'll have to make it blue.
Did you enjoy this article? I would love to hear your thoughts, so don’t be shy and comment below! Please don’t forget to subscribe to my RSS-feed or follow my feed on Twitter, Google+ and Facebook! If you enjoyed the following article we humbly ask you to comment, and help us spread the word! Or, if you would like, drop me an email.
Stix & Stones Pizza
Interior architectural renderings are both fun and challenging, which makes for an awesome project. Here, is a series of images I did for a Chicago Architect. Like all my work, comments, suggestions, and questions are not only welcome, they I encourage them.
Technical:
- 3DSMAX Design 2015
- V-Ray R2.5
- Photoshop CC 2014

Did you enjoy this article? I would love to hear your thoughts, so don’t be shy and comment below! Please don’t forget to subscribe to my RSS-feed or follow my feed on Twitter, Google+ and Facebook! If you enjoyed the following article we humbly ask you to comment, and help us spread the word! Or, if you would like, drop me an email.
Hyper-Realistic CGI Model of a Man
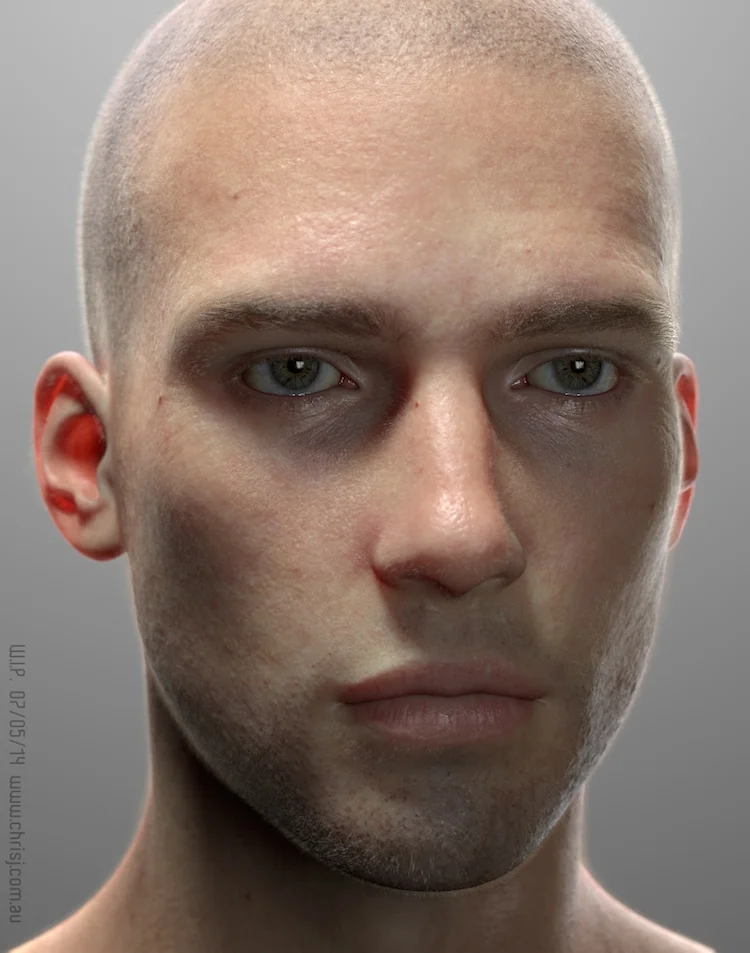
“Here’s something I just whipped up over the past decade. Well, I started it about a decade ago, but have been giving it some more attention recently.
I intend to continue refining and perfecting it indefinitely, for use as the basis for whatever humanoid characters I may need in the future. In this instance I’ve given him an Anatomy Tools inspired makeover as a detail test for my newly revised 3D workflow. It’s a bit rough in places – that’s what tests are all about.”
“Ed” is a hyper-realistic CGI model of a man created by artist Chris Jones that was built with Lightwave,Sculptris, and Krita software and composited with DaVinci Resolve Lite. Jones is keeping track of his progress and answering questions about the project on a NewTek forum, and has posted a few test videos showing his work so far including Ed’s eyeball, the area around Ed’s eyeball, and Ed’s face as a whole.
Did you enjoy this article? I would love to hear your thoughts, so don’t be shy and comment below! Please don’t forget to subscribe to my RSS-feed or follow my feed on Twitter, Google+ and Facebook! If you enjoyed the following article we humbly ask you to comment, and help us spread the word! Or, if you would like, drop me an email.
Mountain Retreat Architectural Rendering

Mountan Side Retreat Rendering

Poolside Mountain Retreat Rendering
“Wow!!! You never cease to amaze me! These look amazing.”
A wonderful home at the base of a mountain. It's a white craftsmen style home, which I was asked to illustrate.
Did you enjoy this article? I would love to hear your thoughts, so don’t be shy and comment below! Please don’t forget to subscribe to my RSS-feed or follow my feed on Twitter, Google+ and Facebook! If you enjoyed the following article we humbly ask you to comment, and help us spread the word! Or, if you would like, drop me an email.
Evermotion Editor's Choice
Editors’ Choice: Daily selection of works published in Evermotion Forum Galleries picked by Evermotion staff.

Editors’ Choice
Did you enjoy this article? I would love to hear your thoughts, so don’t be shy and comment below! Please don’t forget to subscribe to my RSS-feed or follow my feed on Twitter, Google+ and Facebook! If you enjoyed the following article we humbly ask you to comment, and help us spread the word! Or, if you would like, drop me an email.
3D Studio MAX 2015 Base Scene with Exposed Lighting for Architectural Visualization

Yesterday, I received a Tweet requesting "an empty stage with exposed lighting for architectural visualization."
Below is a download link, to a 3DS MAX 2015 using V-Ray 2.4 scene, with my basic setup, which is optimized for an exterior architectural rendering and visualization.

Most importantly, if you have any questions about this basic architectural rendering setup scene, feel free to post a comment.
Did you enjoy this article? I would love to hear your thoughts, so don’t be shy and comment below! Please don’t forget to subscribe to my RSS-feed or follow my feed on Twitter, Google+ and Facebook! If you enjoyed the following article we humbly ask you to comment, and help us spread the word! Or, if you would like, drop me an email.
The White Shake House Architectural Rendering

3DSMAX, V-Ray, Photoshop + Time = Photo Realistic Architectural Rendering
The ABEL-FERRIS White Shake House Rendering. I was asked to illustrate the "White Shake House" from CAD files to a warm and welcoming 3D Photoreal architectural rendering.
This home took 1 day to model, 1 day to texture, 1/2 day to render and 1/2 day dedicated to post production (color grading and color correction.)
“I reached out to Bobby to commission this render for my father’s property.
Looks really great! I have a feeling Bobby can do this in his sleep He probably already does.”
Did you enjoy this article? I would love to hear your thoughts, so don’t be shy and comment below! Please don’t forget to subscribe to my RSS-feed or follow my feed on Twitter, Google+ and Facebook! If you enjoyed the following article we humbly ask you to comment, and help us spread the word! Or, if you would like, drop me an email.
Evermotion Editors’ Choice
Editors’ Choice: Daily selection of works published in Evermotion Forum Galleries picked by Evermotion staff.

Did you enjoy this article? I would love to hear your thoughts, so don’t be shy and comment below! Please don’t forget to subscribe to my RSS-feed or follow my feed on Twitter, Google+ and Facebook! If you enjoyed the following article we humbly ask you to comment, and help us spread the word! Or, if you would like, drop me an email.
4 Reasons Not to Outsource Your Architectural Renderings

Outsource Your Architectural Renderings
Many problems come to the forefront when outsourcing work to foreign countries.
First, the difficulty lies with the difference in time. Shanghai, China is thirteen hours ahead of Dallas, Texas while India is ten and a half hours ahead. As a patch, some of these companies have a representative in the United States. This does solve the problem. Their representative is only around to answer phones and does not do any of the work. Now you are involved in a game of passing information from one person to another before it is received by the person that is assigned your work.
Another issue rears its ugly head. You are probably thinking that since we are off cycle, things will be completed faster. Instead, they take additional time. One day turns into two and before you know it, you are weeks behind.
The second issue is the language barrier. There is no question that the representative speaks English. There are still difficulties to overcome when attempting to have your 3d rendering completed. Edits and changes have to be translated. As we all know, the true meaning can easily get lost in translation. Forget about the direct meaning of the words you speak. What about the delivery? Have you ever made a wise crack or sarcastic comment to a foreign customer service representative only to have them take you seriously?
Third, their culture is different. All of the pictures in the world will not change that fact that your outsource work will be completed by somebody from a completely different culture. Styles are difficult enough to keep up with when living in the Continental United States. Your architectural visualization piece may be accurately represented, but the landscaping package will have a peculiar look. Now you are relegated to driving neighborhoods and photographing exterior architectural visualization groups.
Finally, how much time do you have? It takes time to manage a team from a foreign country. I bet your time is worth more than any potential savings could possibly make. Imagine saving $200 and spending an additional three to four hours. That is imagining also; odds you are not even going to save $200 on an architectural rendering. Your 3d illustration will require a lot of time and effort to complete.
Delays caused by the difference in time zone, lack of English as a primary language and language translation for the working staff eliminate any perceived value. Add in time delays and now you’re starting to have a problem. You will have to save a lot, because, the extra management time will make the project time consuming and difficult. You will have to work hard for every nickel you save, if you save any money at all. Take any difference in fee structure and couple it with the extra management time and aggravation and you suddenly have a project that is more expensive to implement. In many cases, the time delays alone are substantial enough to create difficulty.
Fulfill your architectural visualization needs of a company that resides within the United States. You will benefit with reduced management, time and aggravation. Your architectural illustrations can be completed economically without outsourcing.
Save time, money and aggravation by having your architectural visualization project completed within the United States.
Did you enjoy this article? I would love to hear your thoughts, so don’t be shy and comment below! Please don’t forget to subscribe to my RSS-feed or follow my feed on Twitter, Google+ and Facebook! If you enjoyed the following article we humbly ask you to comment, and help us spread the word! Or, if you would like, drop me an email.
Negotiate Your Hourly and Project-Based Pricing

If you’re an architectural illustrator, doing freelance by the hour, you are going to have to determine your pricing structure. For example, do you charge by the hour? What’s a reasonable rate to ask? Are you better off charging clients on a project basis?
Here are some tips for calculating your hourly and project rates and how to negotiate pricing with your client.
1. Determining Your Worth
Before you submit a quote for any work, ask yourself these questions:
What is the market rate for architectural illustrators in your location?
How experienced are you? Not just as an architectural illustrator, but as a home based business? Being awesome at architectural rendering is good, but being able to meet deadlines, exceed expectations and above all, being reliable, are essential qualities for an architectural illustrator.
What rate are you willing to accept?
2. Calculating an Hourly Rate
If you’ve been a salaried employee all your life, making the switch to self-employment requires a change of thinking. Some companies may be tempted to coerce you into a rate that reflects what they’d be willing to pay a salaried employee. But self-employment brings its costs and credit to you. Your rate should reflect this, as well as your expertise.
If you are used to being a salaried employee, here’s a good rule of thumb to follow when determining an hourly rate:
Divide your former salary by 52 (work weeks); then divide that number by 40 (the number of work hours in a week). Then mark it up 25-30%.
Your mark-up covers both your value and experience, but also takes care of our business costs such as networking, selling, and other administration, not forgetting your self-employment tax obligations and healthcare insurance costs.
3. Calculating Project Rates
Many clients will prefer to manage their costs and ask for you to rate your work as a fixed project fee. This can also work to your benefit if you price it right. However, it can also work against you, especially if your client is new, and the project scope creeps beyond your original expectations.
The best way to calculate project rates is to spend some time scoping out what you’ll deliver. Use your knowledge of your work methods and familiarity with the subject matter to structure your time commitment, for example:
Research: 2 Hours
Produce gray scale model: 8 Hours
Two rounds of edits: 2 Hours
Add color and lighting 8 Hours
Two rounds of edits: 2 Hours
Final render: 2 Hours
Total: 24 Hours @ $x hourly rate = $x
Remember, you don’t have to put this calculation in front of your client, but it gives you a useful framework for covering your costs and delivering within scope. Don’t forget to add a caveat to address that any work done over and above this scope of work will be charged at an hourly rate
4. Negotiating Your Rate:
Negotiation is hard to avoid and can often shed light on whether this is a client that you really want to work with for. If you are confident that your pricing reflects your value and the market rate, being haggled hard on price can get a relationship off on the wrong foot. Likewise, being locked in at a low rate can quickly devalue the relationship from your perspective.
So, when it comes to negotiating, be prepared to stand your ground but be willing to compromise. If you foresee further business here, try to be flexible.
5. What About Retainers?
If a client starts to send a lot of volume your way, retainer-based pricing can be advantageous, even if it’s at a lower hourly rate than your advertised price.
A retainer is a fee paid for a pre-determined amount of time or work (usually within a month) and is often paid up-front. A retainer agreement can deliver the benefit of predictable work and income while giving your client the reassurance of having you on “stand-by” and a clear view of monthly costs.
Many architectural illustrators charge the full retainer fee, even if they don’t work the entire hours allocated. If you value the relationship, steer clear of this; instead, roll unused hours over to next month.
Good luck!
Did you enjoy this article? I would love to hear your thoughts, so don’t be shy and comment below! Please don’t forget to subscribe to my RSS-feed or follow my feed on Twitter, Google+ and Facebook! If you enjoyed the following article we humbly ask you to comment, and help us spread the word! Or, if you would like, drop me an email.
The Wood Paneled Cigar Room
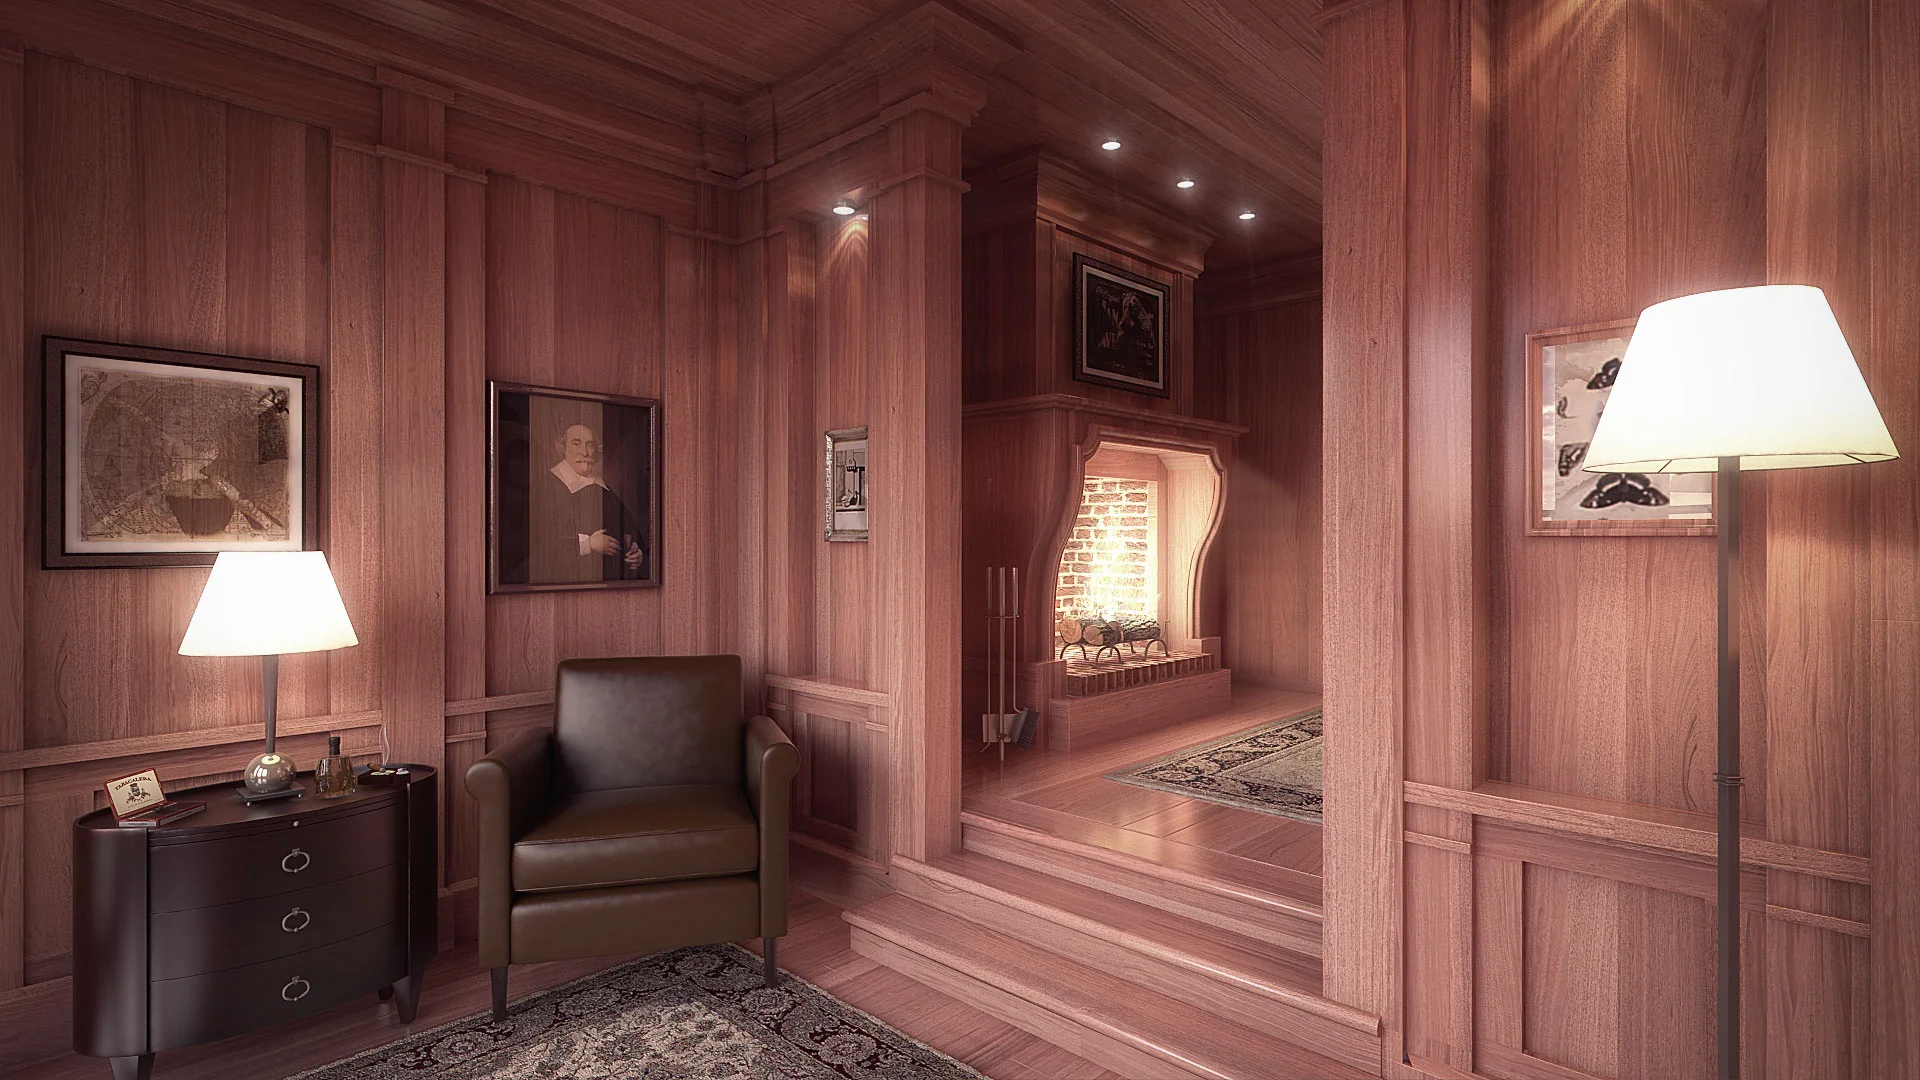
The Wood Paneled Cigar Room Interior Architectural Rendering
Here is a small, but wonderfully warm space, for Z Feng Architect and Company out of Chicago, Illinois. It was a fun project and I think it turned out great!
- Autodesk® 3ds Max® Design
- V-Ray® for Autodesk® 3ds Max®
- Adobe Photoshop CC
Did you enjoy this article? I would love to hear your thoughts, so don’t be shy and comment below! Please don’t forget to subscribe to my RSS-feed or follow my feed on Twitter, Google+ and Facebook! If you enjoyed the following article we humbly ask you to comment, and help us spread the word! Or, if you would like, drop me an email.
Marvelous Designer 4!

We are excited to announce the official release of Marvelous Designer 4!
Marvelous Designer 4 includes new features that are outstanding,
such as Quad, FBX importer and Symmetric Editing.
Highlighted features
Quadrangulate
Symmetric Design/Editing
FBX Import
1 to N Sewing
Basting (Tack, Tack on Avatar)
Normal Flipping
Layer Clone
Wrapping Arrangement
Scale Rotation Pivot
Multiple Selection
Detailed videos are available at Learn > New in MD4 and, MD4 manual is available at here.
Price
For pricing information, please visit MD Pricing page.
Users who purchased MD3 during Open Beta period get free upgrade to MD4.
Existing MD3 users get 50% off on their upgrade.
→ MD2 users are not eligible for upgrading price.
Did you enjoy this article? I would love to hear your thoughts, so don’t be shy and comment below! Please don’t forget to subscribe to my RSS-feed or follow my feed on Twitter, Google+ and Facebook! If you enjoyed the following article we humbly ask you to comment, and help us spread the word! Or, if you would like, drop me an email.