

BLOG
Excellent Service

Z Feng Architect recommends Whitebirch Studio.
Interested in working with Whitebirch Studios?
Did you enjoy this article? I would love to hear your thoughts, so don’t be shy and comment below! Please don’t forget to subscribe to my RSS-feed or follow my feed on Twitter, Google+ and Facebook! If you enjoyed the following article we humbly ask you to comment, and help us spread the word! Or, if you would like, drop me an email.
TRICKS OF THE TRADE

The ability to create realistic depth in a photograph (rendering), a 2-dimensional plane, is the sign of a good photographer (rendering) When shooting stills or video, it’s an important detail to make sure your shots have depth. Sometimes, however, that is sometimes easier said than done. In the quick, 3-minute video clip below, cinematographer Matthew Rosen, covers his top 5 favorite ways to ensure his image aren’t falling flat. The video is geared towards cinematography and moving pictures, but many of the techniques can be transferred into still photography as well. Well worth a watch even if you never shoot video.
TRICKS OF THE TRADE
In the beginning of the clip, Rosen explains why it’s important to have depth in an image, “It’s always my goal when I shoot to give this 2D image as much depth as I possibly can. The more tricks you have up your sleeve to conjure up depth, the more you will immerse your audience.” In order to achieve it, he suggests using these old tricks of the trade:
- Lighting And Shadow – Use a higher contrast between light and shadow to create a deeper feel.
- Focus – Use a shallow depth of field to create a visual of distance between subjects.
- Perspective – Use a perspective that creates a convergence of parallel lines (think leading lines) to simulate a deep depth of field.
- Parallax – Objects closest to the camera will appear to move quicker than those in the background.
- Occlusion – A type of transition in which a foreground subject completely covers a subject in the background as the camera pans behind the foreground subject.
Let’s listen to Rosen break it down in the video clip:
Did you enjoy this article? I would love to hear your thoughts, so don’t be shy and comment below! Please don’t forget to subscribe to my RSS-feed or follow my feed on Twitter, Google+ and Facebook! If you enjoyed the following article we humbly ask you to comment, and help us spread the word! Or, if you would like, drop me an email.
aXYZ HUB THE 3D ASSET BROWSER
As 3D Human Characters & 3D Assets become ever more important in visualizations, animations and illustrations,
we decided to develop a simple tool to improve your workflow!
ORGANIZE AND MANAGE!

With aXYZHUB® you now have a unique and simple way to navigate, choose, catalog and keep clean and organized your 3D Assets in order to optimize your workflow.
ADD 3D ASSETS TO YOUR SCENES!

Forget about opening individual files and merge one by one! With aXYZHUB® you can populate your 3D scene within a click. You don't need to remember where your model files are located in your drive. All your 3D Assets are organized and accessible from aXYZHUB®.
RESIZE!

Ohh no! My 3D Assets are in centimeters and my project is in inches! With aXYZHUB® you can forget about scaling issues. All your 3D Rigged Characters and 3D Assets are scaled and ready-to-be-used in your project.
CREATE PRESETS!

Save hours of your precious time! You can create ready-to-use
presets of 3D Characters and Assets to simply merge in your scene each time you need them.

RENDERING READY!
If you work with V-Ray, Mental Ray or Thea, you are able to set up your converted model's versions to be directly accessible from aXYZHUB® and ready to be rendered!

KEEP YOUR CATALOG UPDATED!
Each time AXYZ publishes a new character, aXYZHUB® will inform you. This way, each time you start a new Arch Viz project you will have the ability to evaluate if the new product additions are suitable for your project!
FEATURES HIGHLIGHTS
ORGANIZE AND MANAGE
With aXYZHUB® you can have a unique and simple way to navigate, choose, catalog and keep clean and organized your 3D Assets in order to optimize your workflow.
ADD 3D ASSETS TO YOUR SCENES
Forget about opening individual files and merge one by one! With aXYZHUB® you will be able to populate your 3D scene within a click. You will not need to remember where your model files are located in your drive. All your assets will be organized and accessible from aXYZHUB®.
RESIZE
Ohh no! My 3D Assets are in centimeters and my project is in inches! With aXYZHUB® you can forget about scaling issues. All your 3D Rigged Characters and 3D Assets will be scaled and ready-to-be-used in your project.
CREATE PRESETS
Save hours of your precious time! You can create ready-to-use presets of 3D Characters and Assets to simply merge in your scene each time you need them.
RENDERING READY
If you work with V-Ray, Mental Ray or Thea, you will be able to set up your converted models versions to be directly accessible from aXYZHUB® and ready to be rendered!
Did you enjoy this article? I would love to hear your thoughts, so don’t be shy and comment below! Please don’t forget to subscribe to my RSS-feed or follow my feed on Twitter, Google+ and Facebook! If you enjoyed the following article we humbly ask you to comment, and help us spread the word! Or, if you would like, drop me an email.
Forest Pack Pro v4.3.0 beta
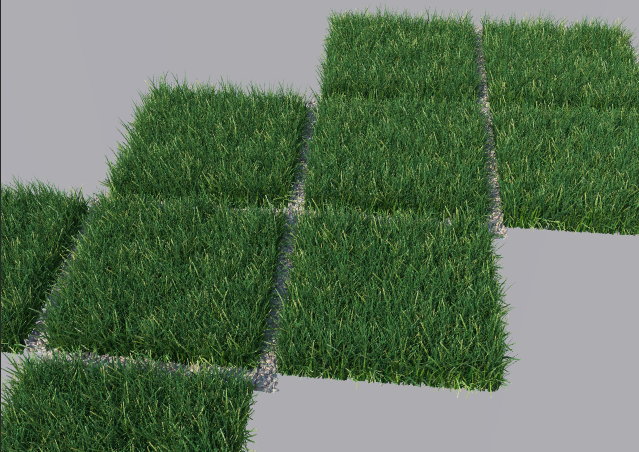
New level of detail and visibility triggers. See the feature list.
New features and changes:
- Forest LOD (Level of Detail).
- A new type of object, "ForestLOD", is used to define levels of detail. Once created, assign it as Custom Object in Forest.
- Visibility triggers by Distance to camera or Screen size.
- Support for billboards and geometry.
- Custom materials.
- LOD properties can be adjusted in Camera rollout.
- Added Areas->Limit by Surface Material ID.
- Areas->Falloff Affect is splitted in Density and Scale values.
- Forest Tools->Data exporter to XML files.
- Added General->Disable Pop-ups: turns off all suggestions and warning messages, except critical errors (this option is global and persistent).
- Geometry->Get Size from Library is removed and enabled by default.
- Geometry->Global Size parameters are removed, although they are accessible by Maxscript ("globs¡ze", "width", "height")
- Geometry->Use Object Dimensions is replaced by local Scale parameter.
- New Display->Proxy model: Arrow (non-symmetrical)
- Added Display->Disable Object.
- Forest Tools->Instantiate copies User Properties, Object ID and wireframe color from the source object.
Library:
- 16 new presets: Gravel, including detail and large scale models.
- Added materials for Corona Renderer.
Fixes:
- Fixed problem of Exclude areas with Inverted Falloff Curves.
- Fixed issues with Distribution->Diversity Map and UV Surfaces.
- Fixed rare problem related to missing Surfaces on load.
- Fixed minor issues in Maxscript functions.
- Fixed potential crashing bug on Forest cloning.
- Forest Color ignores status of Override checkbox when using Tint by Element.
- Added Undo support to Geometry->Copy/Paste operations.
Registered customers of Forest Pack Pro can download the upgrade from User Panel->Beta versions
Image by State of Art Academy
Did you enjoy this article? I would love to hear your thoughts, so don’t be shy and comment below! Please don’t forget to subscribe to my RSS-feed or follow my feed on Twitter, Google+ and Facebook! If you enjoyed the following article we humbly ask you to comment, and help us spread the word! Or, if you would like, drop me an email.
Autodesk's Featured 3D Artist
There are a million stories. Tell us yours.
Share your best work with the AREA community and tell us the story behind your creations.
I am proud to share with you an Autodesk Artist blog that I was featured in. Several months ago I received a call from Autodesk, requesting an interview for a featured story on a new "Tell Us Your Story" blog, over on the Autodesk Area website. Of course, I was excited to speak with them, and the featured post has now gone live.

Did you enjoy this article? I would love to hear your thoughts, so don’t be shy and comment below! Please don’t forget to subscribe to my RSS-feed or follow my feed on Twitter, Google+ and Facebook! If you enjoyed the following article we humbly ask you to comment, and help us spread the word! Or, if you would like, drop me an email.
My Freelance Tools
There are a lot of resources for freelancers and believe me, I have tried them all. After many years in the business, these are the tools that have floated to the top of my freelance tools.

Save Time Billing
FreshBooks customers spend less time on paperwork, freeing up 2 days per month to focus on the work they love. What would you do with that extra time?
Grow Your Business
FreshBooks is built to support the needs of growing businesses. On average, FreshBooks customers double their revenue in the first 24 months. Woot!
Get Paid Faster
With FreshBooks, you can easily invoice clients from your desk or on the go. In fact, FreshBooks customers are paid an average of 5 days faster.

EVERNOTE BUSINESS
Where great ideas converge
- Secure, flexible sharing
- Room for projects to grow
- Access to everyone's knowledge

Powerful CRM
Manage contacts, organizations, partners, vendors and suppliers. See everything from background, email history, events, projects or opportunities. More
Project Management
Make sure you’re on top of your project at every stage – track project activity and performance against milestones. More
Powerful Integration
Integration with email, Box, Dropbox, Evernote, Google Apps, MailChimp, QuickBooks Online, QuoteRoller, Torpio, Zapier, and more. More
Macro or Micro View
Look at your business any way you want with task dashboard, activity sets, reports and more. More
Go Mobile
Supporting iPhone and Android phones and popular tablets, the Insightly mobile app has you covered. More
Social CRM
We’ll detect virtually every social media profile related to a contact’s email address. More
Did you enjoy this article? I would love to hear your thoughts, so don’t be shy and comment below! Please don’t forget to subscribe to my RSS-feed or follow my feed on Twitter, Google+ and Facebook! If you enjoyed the following article we humbly ask you to comment, and help us spread the word! Or, if you would like, drop me an email.
Photoshop on a Chromebook

In partnership with Google, Adobe is proud to introduce Project Photoshop Streaming, a new technology beta. Initially, this beta will be available exclusively to select North America based Adobe education customers with a paid Creative Cloud membership.
Project Photoshop Streaming enables selected participants to access Photoshop on Chromebooks. Applications delivered via streaming are easy to access and easy to manage. Even better, streaming apps work directly with files in Google Drive, so no need to download and re-upload files - just edit directly in the cloud.
Project Photoshop Streaming includes:
- Creative tools: Streaming access to Photoshop with other products coming soon
- Access from any Windows device with a Chrome browser or from a Chromebook
- Learning tools: Access to Adobe Education Exchange learning content and an in-app Learning panel called 'Learn Now'
- Project Photoshop Streaming Feedback and Forum support
Project Photoshop Streaming is an exclusive program. If you are interested in applying, please review the eligibility requirements and application process and submit your application here.
Did you enjoy this article? I would love to hear your thoughts, so don’t be shy and comment below! Please don’t forget to subscribe to my RSS-feed or follow my feed on Twitter, Google+ and Facebook! If you enjoyed the following article we humbly ask you to comment, and help us spread the word! Or, if you would like, drop me an email.
THE PSYCHOLOGY OF REQUIRING A DEPOSIT

Two important things happen when you say to your client: “I’ll need 50%, up front, to start the work and the balance is due when the work is completed.”
- You are viewed as professional: Your client now sees you as a person who has payment policies in place. They respect you, and they are clear on what you expect and how it’s going to go.
- A commitment is formed: Your client is fully committed when they pay a deposit. When some one pays a deposit towards something, they are making a commitment to the project. It’s a psychological thing. Without a deposit, there is no real commitment from your client. It’s like buying plane tickets. My trip to Chicago last year was just talk until I plunked down the $500 for plane tickets. Once that money was paid, it was a reality. We were fully committed.
Don’t begin the work without a commitment from your client in the form of a deposit
Did you enjoy this article? I would love to hear your thoughts, so don’t be shy and comment below! Please don’t forget to subscribe to my RSS-feed or follow my feed on Twitter, Google+ and Facebook! If you enjoyed the following article we humbly ask you to comment, and help us spread the word! Or, if you would like, drop me an email.
The best one-minute animation you'll see all year
This brilliant short shows just how little time you need to entertain and make a point.
It takes real skill to entertain an audience for over an hour with a CG animation. But in a way, doing so in little over a minute is even more challenging. And here's an example of an animated short that does just that – combining brilliant 3D craft, a clever script and an unexpected ending with fabulous results.
It's the creation of House Special, a spin-off company fromLaika, the Portland animation studio behind such quirky feature films as The Boxtrolls. And it's already won a ton of awards, including Best Minute Movie at Animation Block Party in Brooklyn, Short Film Silver at The Australian Effects and Animation Festival, and Audience Favorite (3D Animation) at the California International Animation Festival.
Did you enjoy this article? I would love to hear your thoughts, so don’t be shy and comment below! Please don’t forget to subscribe to my RSS-feed or follow my feed on Twitter, Google+ and Facebook! If you enjoyed the following article we humbly ask you to comment, and help us spread the word! Or, if you would like, drop me an email.
Procedural UVW layout and texture baking tool for 3dsMax.

The Lazy UVW editor is a way to procedurally create seamless textures without having to unwrap uvs. It accomplishes this by using multiple uvw channels to cover pinching, stretching, or seams of the basic uvw mapping options, and the resulting map may be baked down to one channel if desired.
Did you enjoy this article? I would love to hear your thoughts, so don’t be shy and comment below! Please don’t forget to subscribe to my RSS-feed or follow my feed on Twitter, Google+ and Facebook! If you enjoyed the following article we humbly ask you to comment, and help us spread the word! Or, if you would like, drop me an email.
Chicago Office Space Renderings
Ah, Chi-Town! I am from Chicago, born and raised, so when I was asked to illustrate an open space in a downtown Chicago High-Rise, I jumped at the chance.

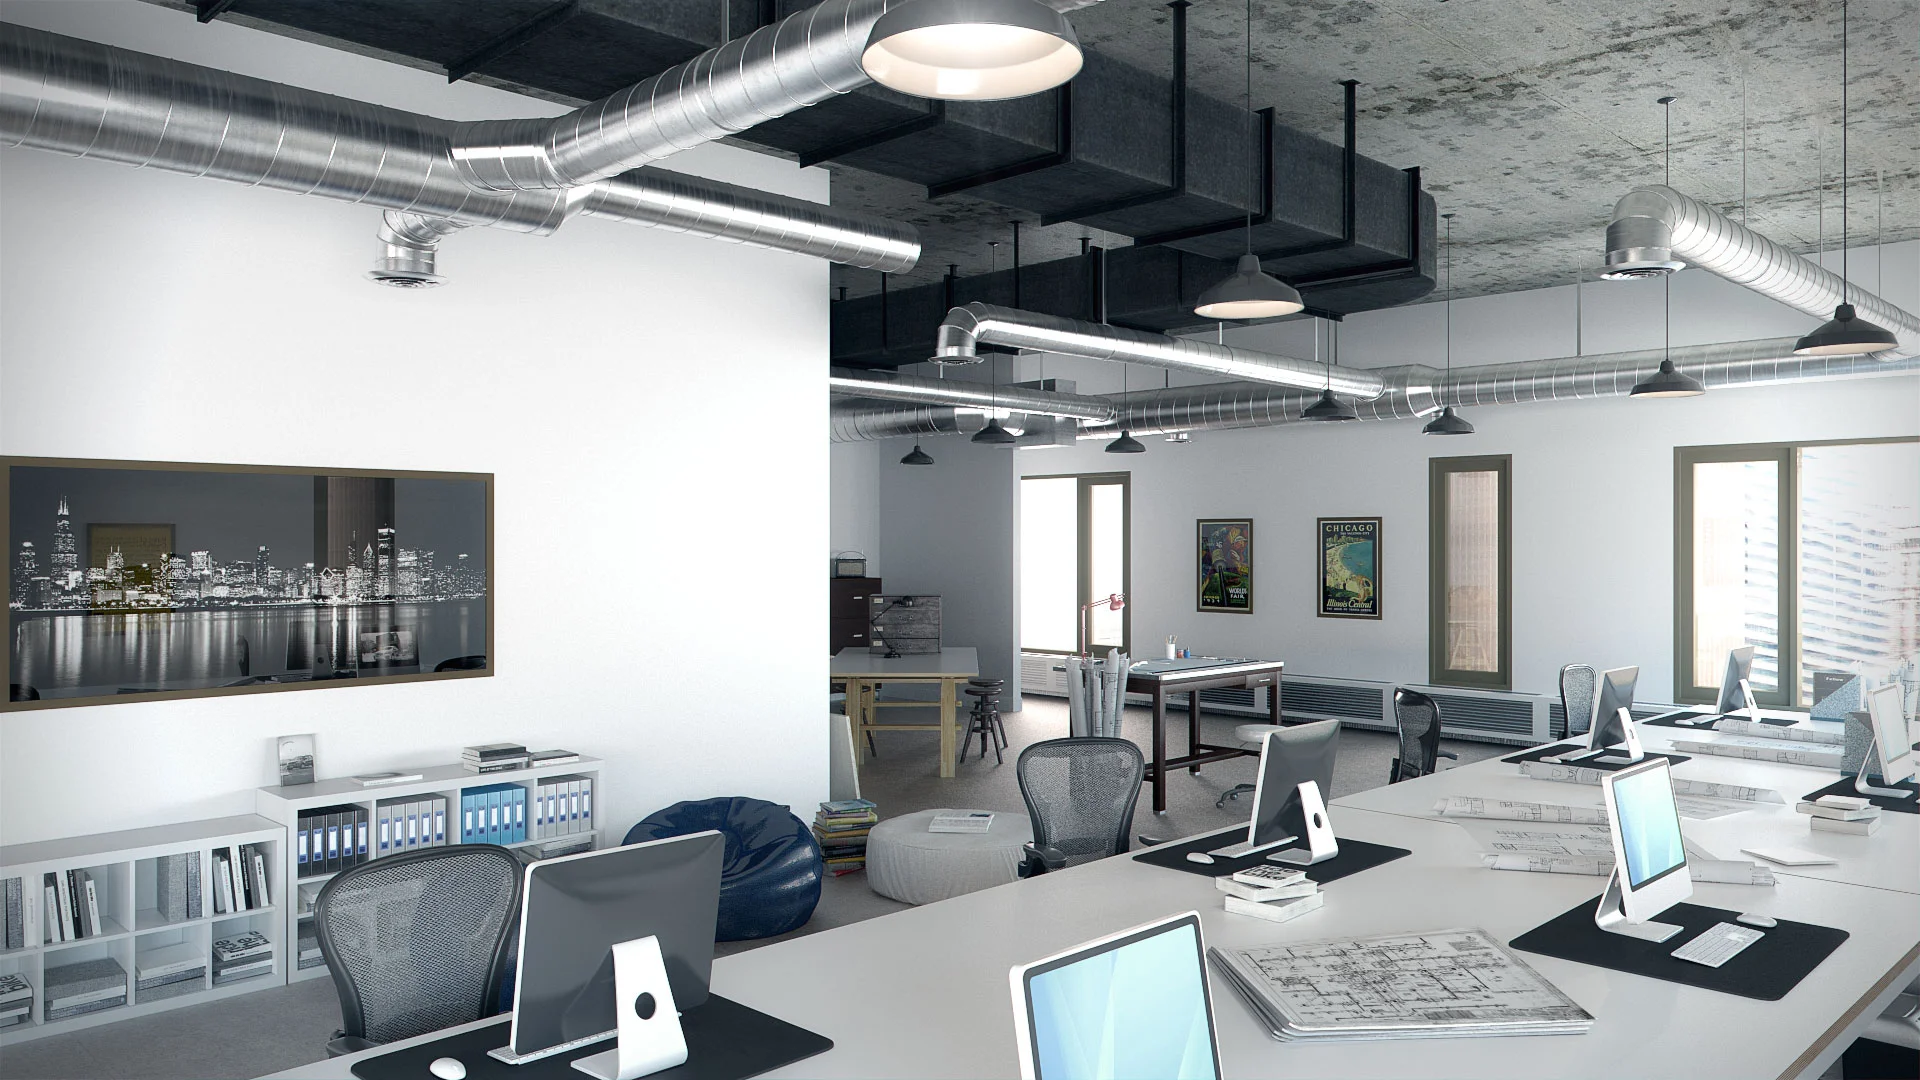
The deliverable was a series of 360 panoramic files, which seems to be making a comeback. I remembered about 15 years ago when I was doing a lot of 360 panoramas, but they seem to have fallen out of favor. The experience on the PC is underwhelming, but on an iPad, using iPano, it's awesome!
Like all of my work, comments and suggestions to improve are welcomed and encouraged. OH YAH, go Bears!
Did you enjoy this article? I would love to hear your thoughts, so don’t be shy and comment below! Please don’t forget to subscribe to my RSS-feed or follow my feed on Twitter, Google+ and Facebook! If you enjoyed the following article we humbly ask you to comment, and help us spread the word! Or, if you would like, drop me an email.
Rebus Render Farm
Are you under a tight deadline? I would highly recommend the Rebus Render Farm. Over the last several years I have tested almost all my options, from Amazon to Google, and all the major render farm as a service.
This weekend I was wrapping up the "Chicago Office Space" architectural rendering, the clock was ticking and I was feeling the pressure, so I reached out to the Rebus Render folks. I downloaded the Rebus Render Farm Farminizer software, which checks and starts your render job from inside your 3D software. I clicked render and literally, in a matter of an hour, I had 4 - 6000X3000 crystal clean renders downloaded to my project folder.
I know, but at what cost, you ask? This was one reason I never pulled the trigger on utilizing a render farm service. My fear was my image would be held hostage for some ungodly dollar amount. Most render farm services have calculators, but they are notoriously not accurate. Each 6000 X 3000 still rendering cost around $10.
There are many good render farm solutions, some are less expensive, but none are as easy as Rebus Render Farm. So, if you are racing against the clock, I would recommend Rebus.

What are the advantages of the Rebus Render Farm?
The RebusFarm increases the speed of your renderings with massive rendering power provided by the Render Farm with its render-node clusters. Our render servers calculate still images and 3D animations in breathtaking speed and excellent quality.
Submitting your render jobs to the Rebus Render Farm saves you high acquisition costs compared to the purchase of expensive local hardware. The render nodes in the Rebus Render Farm guarantee optimal results, and deliver your images a thousand times faster than a single High-End-Workstation could ever do.
With the Rebus Render Farm you can solve your render tasks online in the cloud. Using the Farminizer software, which can be downloaded from our homepage, you can upload your 3D graphics and 3D animations to the cloud where our service takes over the rendering. This online functionality saves you expensive hardware and software licencing costs - the user-friendly Farminizer software and our Render Farm makes it possible!
Render Farm Specs
RebusFarm is the most advanced Render Farm Service in the world wide web. Leading in terms of hardware, price, number of supported software packages, development and service.
Supported Software
Autodesk 3ds Max
- V-Ray
- mental ray
- Maxwell Render
- Scanline Render
- Corona Render
Autodesk Maya
- mental ray
- V-Ray
- Maxwell Render
- Software Render
- Arnold Render
Maxon Cinema 4D
- V-Ray
- Advanced Render
- Maxwell Render
- Standard Render
- Physical Render
Autodesk Softimage
- mental ray
- Arnold Render
Maxwell Render
- Standard Render
Luxology modo
- Standard Render
Newtek Lightwave 3D
- Standard Render
- Kray
Blender
- Standard Render
- Cycles
- V-Ray
Distributed Still Render
- 3ds Max
- Maya (mr)
- Cinema 4D
- Softimage
- Maxwell Render
- modo
Standalone Software
- Maxwell Render
- Indigo Render
Render Cloud
Equipped with the Farminizer Software and the Mobile App you are always a click away from your renderjob, controlling the Render Farm and your renderjob. The facility is connected to the world wide web with 20 Gbit/s.
Hardware
We always use the newest hardware, because we know exactly what you need: Pure computing power. Your renderjob will get the full 49,440 GHz computing power from brand-new Dual Xeons, equipped with 32-64 GB RAM.
1700 XEON x 6 x 2.40 GHz = 24,480.00 GHz
1300 XEON x 8 x 2.40 GHz = 24,960.00 GHz
All CPUs include Hyperthreading which will double the total clock frequency to 98,880.00 GHz. The benefits of Hyperthreading are NOT charged. You will get them for FREE.
Provided Hardware
Total Computing Power
- 49,440 GHz
- Cinebench: 2,23 Mio.
Server Type A:
(650 Pieces)
- Dual XEON E5 2630v3 (16core)
- 16 x 2,40 GHz
- 64 GB RAM
Server Type B:
(850 Pieces)
- Dual XEON E5645 (12core)
- 12 x 2,40 GHz
- 32-64 GB RAM
Operating System
- Win 7 (64 Bit)
Did you enjoy this article? I would love to hear your thoughts, so don’t be shy and comment below! Please don’t forget to subscribe to my RSS-feed or follow my feed on Twitter, Google+ and Facebook! If you enjoyed the following article we humbly ask you to comment, and help us spread the word! Or, if you would like, drop me an email.
5 Ways To Increase Your Value To Your Client

5 Ways To Increase Your Value To Your Client
Most of us, designers, assume our client cares only about the quality of our design work. While it’s true that he cares how awesome our design is, the client also cares about other things.
Here are 5 things your client cares about, and how to increase your value to him. Nail these, and you’ll be able to charge more for your work.
Did you enjoy this article? I would love to hear your thoughts, so don’t be shy and comment below! Please don’t forget to subscribe to my RSS-feed or follow my feed on Twitter, Google+ and Facebook! If you enjoyed the following article we humbly ask you to comment, and help us spread the word! Or, if you would like, drop me an email.
Freelance Hourly Rate Calculator
Freelance Hourly Rate Calculator
A simple calculator to help you find out how much to charge as a freelancer.

How This Calculator Works
The Freelance Hourly Rate Calculator will help you determine what you need in order to support the lifestyle that you desire.
By entering information into each field, you can calculate an hourly rate based on your costs, number of billable hours, and desired annual profit.
Section One asks about your desired lifestyle. This includes how much profit you would like to make annually, how many hours a day you will be working, and how many days a week will be on your schedule.
Section Two asks about your daily and monthly personal expenses. This includes rent/mortgage, and occasional expenses.
Section Three asks about your monthly business and logistical expenses. This includes office rental fees, software subscriptions and communication costs.
Based on this information, you will be given your minimum necessary hourly rate, and total annual salary. Try it out, and see what it will take to live the lifestyle of your dreams!
Charging for Freelance Work
Here at Motiv, we believe that your preferred lifestyle should be the number one factor in selecting your rate, and settling on your annual salary as a freelancer. This tool will assist you in finding this information. All it takes is a little planning on your part.
Take a mental snapshot of the way you want your life to look in a year, five years and ten years.
Once you have a clear idea of your coming goals, you can begin to fill in the blanks.
The calculator is going to factor all of this information in your final result. Knowing what goals you hope to reach will give you the blueprint you need to work the way you want to.
Your dream lifestyle is within reach!
Did you enjoy this article? I would love to hear your thoughts, so don’t be shy and comment below! Please don’t forget to subscribe to my RSS-feed or follow my feed on Twitter, Google+ and Facebook! If you enjoyed the following article we humbly ask you to comment, and help us spread the word! Or, if you would like, drop me an email.
How Much Should I Charge?

A potential client wants a proposal for a design project? Awesome. Answer 5 questions, and know how much to charge to make this project profitable.
Freelance designers are victims of a haphazard pricing structure—without set industry guidelines, designers must rely on past project pricing, colleague recommendation, or generic pricing lists to conjure a “fair” price for the work. Prices are difficult to match to inflation or utility costs, and little consideration is given to the relationship between designer and client.
Aiming to simplify this ambiguous pricing model, learning platformnuSchool developed “How Much Should I Charge?,” a web tool that suggests a freelance base rate and negotiation window, dependent on a designer’s salary goals, costs, and enjoyment of the project.

Did you enjoy this article? I would love to hear your thoughts, so don’t be shy and comment below! Please don’t forget to subscribe to my RSS-feed or follow my feed on Twitter, Google+ and Facebook! If you enjoyed the following article we humbly ask you to comment, and help us spread the word! Or, if you would like, drop me an email.
Self Promo Video for Autodesk Write-Up
Here is a little promo video Autodesk requested of me. I'll be featured on an Autodesk website, soon.
Autodesk is a world leader in 3D design software for entertainment, natural resources, manufacturing, engineering, construction, and civil infrastructure.
Did you enjoy this article? I would love to hear your thoughts, so don’t be shy and comment below! Please don’t forget to subscribe to my RSS-feed or follow my feed on Twitter, Google+ and Facebook! If you enjoyed the following article we humbly ask you to comment, and help us spread the word! Or, if you would like, drop me an email.
The Carriage House Renderings
Owner/Designer at Freedom Design, Michelle Marriott, asked me to illustrate her Carriage House. Freedom Design is a firm located in Woods Cross, Utah. I have created several architectural renderings for Michelle, and I have to say, she is one of my favorite clients.

Pool side of the Carriage House Architectural Rendering

Driveway side of the Carriage House Architectural Rendering
The Carriage House is part of the Mountain Retreat series of Architectural Renderings.
Did you enjoy this article? I would love to hear your thoughts, so don’t be shy and comment below! Please don’t forget to subscribe to my RSS-feed or follow my feed on Twitter, Google+ and Facebook! If you enjoyed the following article we humbly ask you to comment, and help us spread the word! Or, if you would like, drop me an email.
What Do I Charge for 3D Design Changes?
I am pretty relaxed with the changes, but after a point I'll bring it to my client's attention. I am more concerned about producing a product that my client loves and the relationship that might come from the project.
At the start of any project I try to ask pertinent questions with my project survey. My project survey is short, simple, and effective. Spending a few minutes at the beginning can save hours later.
After the initial 3d model is complete, I send a gray scale for approval on the modeling. Sometimes, the 3d model is the first time they really see their project, and it initiates design change, which I enjoy being part of that process.

Gray Scale 3d Models
The gray scale model serves several purposes. First, and foremost, it allows the client to see their project for the first time. Sometimes, more times than not, it's not what they were expecting. Or, it's the Architect's or Designer's client who is surprised. At the gray scale stage, I allow changes as long as they are not extensive. However, I could justify the extra charge at this stage, considering what it would cost to make these changes with a sledgehammer.
Also, at the gray scale stage, you'll be able to see the camera view and lighting scheme. The view and lighting, other than the design, is the most important part of any architectural illustration. Composition is key!

After the client approves the grayscale renderings, and any changes are made, I move on to the color (texture and materials). Like the view and lighting, textures and materials are important, too. Here, I can spend 1/3 of my allocated time building proper textures and materials. It takes a lot of work to avoid the awful tiling you see in less well-executed architectural renderings. At the beginning of any project, I request color samples. A large wall with small stone might take me a few hours to create when a painted concrete wall might take a few minutes. Having said that, a concrete wall that turns into a rock wall later in the design might occur an hourly charge. At the least, I'll make my client aware of the extra time it'll take so they might have to deal with a delayed deadline.
Render times can be extensive, so after things are colored I'll send a lower resolution color proof. The resolution is high enough to see detail, but low enough to avoid long rendering times. Once the lower resolution is approved I'll fine tune settings, for a clean render, and render the final output. If last minute changes are made, after the lower resolution rendering has been approved and the deadline is looming, I might need to use a render farm service. Render farm services come at a cost, a cost that I'll have to pass on to my client.
Final renderings can take from 2 hours per still all the way up to 6 hours per still. I am very sensitive to my client's deadlines, and I'll try to do what it takes to meet them, but last minute changes might need to be curbed. I have, and I will continue to, pull all-nighters to meet deadlines, but I try to avoid them. If the looming deadline is in jeopardy because of my doing, I will pull all-nighters.
Please, if you have other questions, feel free to comment on this thread or email me with your questions.
Did you enjoy this article? I would love to hear your thoughts, so don’t be shy and comment below! Please don’t forget to subscribe to my RSS-feed or follow my feed on Twitter, Google+ and Facebook! If you enjoyed the following article we humbly ask you to comment, and help us spread the word! Or, if you would like, drop me an email.
Adobe Photoshop CC 2014.2

Photoshop CC 2014.2 update
The Photoshop CC 2014.2 update has arrived. Check out new features.
New Doc Presets, New Guide Layouts, Layouts based on a shape, Smarter smart guides, Overscrolling preference, Creative Cloud libraries, and Extract.
- Creative Cloud Libraries - This new addition to the Creative Cloud will allow you to download graphics from the Adobe Market and have them available to inside both Illustrator and Photoshop. The Libraries panel also allows you to add fonts, graphics, PSD’s, colours etc all within the Photoshop and Illustrators. Any content here will be synced automatically to your Creative Cloud storage area. This feature is a wonderful enhancement if you have ever wanted to have a global set of favourites to your workflow. Of course you can create new libraries at any time to organise your content based on your preference
- New Welcome screen - Have you ever wanted to learn new features and techniques straight from within Photoshop? The new welcome screen will present videos to you based on the activities and features that you use.
- Extract Assets - There is a new menu option called Extract Assets, this option is available under the File menu. The primary use for Extract is to pull assets from the PSD comp, especially usefull for Web designers.
- Improved Guides - The new guides feature enables new guides to be created from existing shapes on the canvas, or the ability to create new guides from a template that can be designed on the fly. New Guides Layout is available from the View menu option.
- Windows Touch - The experimental touch features have now moved into the main line and will be enabled for touch based systems. This includes the Microsoft Surface Pro 3.
- 3D Printing - Photoshop now has the ability to read COLLADA rigged and animation data. This feature is available on the timeline, it allows you to pose the model at a certain point, then print it. This feature will be covered in more detailed in a later post.
- 3D PDF - Photoshop CC also supports the option to export 3D PDF’s. The Export 3D PDF option is available from the 3D menu. Selecting this option will output a PDF with all of the 3D PDF controls enabled.
- Scripted Patterns - Scripted patterns have been moved to the Filter menu (Filter / Render / ). The different options have the same names as before Flame, Tree and Picture Frame.
- The Flame option is a new addition and allows you to create a flame on a path or multiple paths.
- Improved display of Properties panel for Live Shapes
- Added transparency support for copy/paste from Photoshop to other applications (Mac only)
- New edge padding option for Select > Modify commands. This option allows you to choose if the selection modification will go outside of the canvas edge or not. There is now a check box controller on each of the participating options under the Select /Modify option. The check box is turned off by default.
- Adobe Color panel (formerly Kuler) is now included with the shipping version
- Size of the Preferences, Keyboard Shortcuts and Menus dialogs have been adjusted to fit wide-screens
Did you enjoy this article? I would love to hear your thoughts, so don’t be shy and comment below! Please don’t forget to subscribe to my RSS-feed or follow my feed on Twitter, Google+ and Facebook! If you enjoyed the following article we humbly ask you to comment, and help us spread the word! Or, if you would like, drop me an email.
Sharp Enlargements Renderings at Any Size
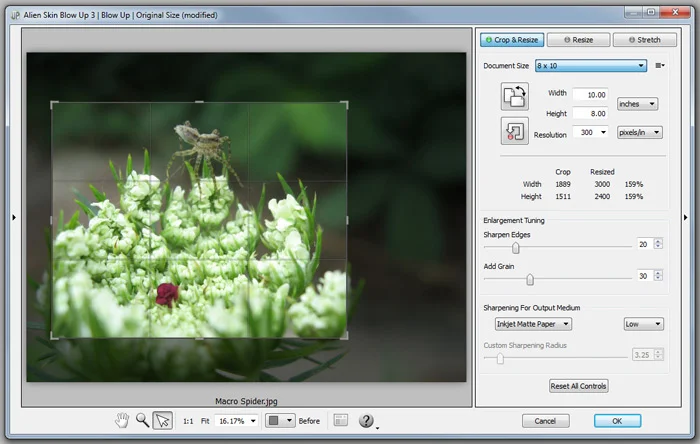
Blow Up keeps renderings crystal clear during enlargement. Especially in large prints hung on a wall, the difference between Blow Up and Photoshop is astounding. Version 3 makes renderings even sharper without computer artifacts.
If you understand Photoshop’s resize command, then you already know how to use Blow Up. Our large library of standard paper sizes makes it even easier. With Lightroom and CMYK support, Blow Up fits into a professional workflow.
Did you enjoy this article? I would love to hear your thoughts, so don’t be shy and comment below! Please don’t forget to subscribe to my RSS-feed or follow my feed on Twitter, Google+ and Facebook! If you enjoyed the following article we humbly ask you to comment, and help us spread the word! Or, if you would like, drop me an email.