
Self Promo Video for Autodesk Write-Up
Here is a little promo video Autodesk requested of me. I'll be featured on an Autodesk website, soon.
Autodesk is a world leader in 3D design software for entertainment, natural resources, manufacturing, engineering, construction, and civil infrastructure.
Did you enjoy this article? I would love to hear your thoughts, so don’t be shy and comment below! Please don’t forget to subscribe to my RSS-feed or follow my feed on Twitter, Google+ and Facebook! If you enjoyed the following article we humbly ask you to comment, and help us spread the word! Or, if you would like, drop me an email.
The Carriage House Renderings
Owner/Designer at Freedom Design, Michelle Marriott, asked me to illustrate her Carriage House. Freedom Design is a firm located in Woods Cross, Utah. I have created several architectural renderings for Michelle, and I have to say, she is one of my favorite clients.

Pool side of the Carriage House Architectural Rendering

Driveway side of the Carriage House Architectural Rendering
The Carriage House is part of the Mountain Retreat series of Architectural Renderings.
Did you enjoy this article? I would love to hear your thoughts, so don’t be shy and comment below! Please don’t forget to subscribe to my RSS-feed or follow my feed on Twitter, Google+ and Facebook! If you enjoyed the following article we humbly ask you to comment, and help us spread the word! Or, if you would like, drop me an email.
What Do I Charge for 3D Design Changes?
I am pretty relaxed with the changes, but after a point I'll bring it to my client's attention. I am more concerned about producing a product that my client loves and the relationship that might come from the project.
At the start of any project I try to ask pertinent questions with my project survey. My project survey is short, simple, and effective. Spending a few minutes at the beginning can save hours later.
After the initial 3d model is complete, I send a gray scale for approval on the modeling. Sometimes, the 3d model is the first time they really see their project, and it initiates design change, which I enjoy being part of that process.

Gray Scale 3d Models
The gray scale model serves several purposes. First, and foremost, it allows the client to see their project for the first time. Sometimes, more times than not, it's not what they were expecting. Or, it's the Architect's or Designer's client who is surprised. At the gray scale stage, I allow changes as long as they are not extensive. However, I could justify the extra charge at this stage, considering what it would cost to make these changes with a sledgehammer.
Also, at the gray scale stage, you'll be able to see the camera view and lighting scheme. The view and lighting, other than the design, is the most important part of any architectural illustration. Composition is key!

After the client approves the grayscale renderings, and any changes are made, I move on to the color (texture and materials). Like the view and lighting, textures and materials are important, too. Here, I can spend 1/3 of my allocated time building proper textures and materials. It takes a lot of work to avoid the awful tiling you see in less well-executed architectural renderings. At the beginning of any project, I request color samples. A large wall with small stone might take me a few hours to create when a painted concrete wall might take a few minutes. Having said that, a concrete wall that turns into a rock wall later in the design might occur an hourly charge. At the least, I'll make my client aware of the extra time it'll take so they might have to deal with a delayed deadline.
Render times can be extensive, so after things are colored I'll send a lower resolution color proof. The resolution is high enough to see detail, but low enough to avoid long rendering times. Once the lower resolution is approved I'll fine tune settings, for a clean render, and render the final output. If last minute changes are made, after the lower resolution rendering has been approved and the deadline is looming, I might need to use a render farm service. Render farm services come at a cost, a cost that I'll have to pass on to my client.
Final renderings can take from 2 hours per still all the way up to 6 hours per still. I am very sensitive to my client's deadlines, and I'll try to do what it takes to meet them, but last minute changes might need to be curbed. I have, and I will continue to, pull all-nighters to meet deadlines, but I try to avoid them. If the looming deadline is in jeopardy because of my doing, I will pull all-nighters.
Please, if you have other questions, feel free to comment on this thread or email me with your questions.
Did you enjoy this article? I would love to hear your thoughts, so don’t be shy and comment below! Please don’t forget to subscribe to my RSS-feed or follow my feed on Twitter, Google+ and Facebook! If you enjoyed the following article we humbly ask you to comment, and help us spread the word! Or, if you would like, drop me an email.
Adobe Photoshop CC 2014.2

Photoshop CC 2014.2 update
The Photoshop CC 2014.2 update has arrived. Check out new features.
New Doc Presets, New Guide Layouts, Layouts based on a shape, Smarter smart guides, Overscrolling preference, Creative Cloud libraries, and Extract.
- Creative Cloud Libraries - This new addition to the Creative Cloud will allow you to download graphics from the Adobe Market and have them available to inside both Illustrator and Photoshop. The Libraries panel also allows you to add fonts, graphics, PSD’s, colours etc all within the Photoshop and Illustrators. Any content here will be synced automatically to your Creative Cloud storage area. This feature is a wonderful enhancement if you have ever wanted to have a global set of favourites to your workflow. Of course you can create new libraries at any time to organise your content based on your preference
- New Welcome screen - Have you ever wanted to learn new features and techniques straight from within Photoshop? The new welcome screen will present videos to you based on the activities and features that you use.
- Extract Assets - There is a new menu option called Extract Assets, this option is available under the File menu. The primary use for Extract is to pull assets from the PSD comp, especially usefull for Web designers.
- Improved Guides - The new guides feature enables new guides to be created from existing shapes on the canvas, or the ability to create new guides from a template that can be designed on the fly. New Guides Layout is available from the View menu option.
- Windows Touch - The experimental touch features have now moved into the main line and will be enabled for touch based systems. This includes the Microsoft Surface Pro 3.
- 3D Printing - Photoshop now has the ability to read COLLADA rigged and animation data. This feature is available on the timeline, it allows you to pose the model at a certain point, then print it. This feature will be covered in more detailed in a later post.
- 3D PDF - Photoshop CC also supports the option to export 3D PDF’s. The Export 3D PDF option is available from the 3D menu. Selecting this option will output a PDF with all of the 3D PDF controls enabled.
- Scripted Patterns - Scripted patterns have been moved to the Filter menu (Filter / Render / ). The different options have the same names as before Flame, Tree and Picture Frame.
- The Flame option is a new addition and allows you to create a flame on a path or multiple paths.
- Improved display of Properties panel for Live Shapes
- Added transparency support for copy/paste from Photoshop to other applications (Mac only)
- New edge padding option for Select > Modify commands. This option allows you to choose if the selection modification will go outside of the canvas edge or not. There is now a check box controller on each of the participating options under the Select /Modify option. The check box is turned off by default.
- Adobe Color panel (formerly Kuler) is now included with the shipping version
- Size of the Preferences, Keyboard Shortcuts and Menus dialogs have been adjusted to fit wide-screens
Did you enjoy this article? I would love to hear your thoughts, so don’t be shy and comment below! Please don’t forget to subscribe to my RSS-feed or follow my feed on Twitter, Google+ and Facebook! If you enjoyed the following article we humbly ask you to comment, and help us spread the word! Or, if you would like, drop me an email.
Sharp Enlargements Renderings at Any Size
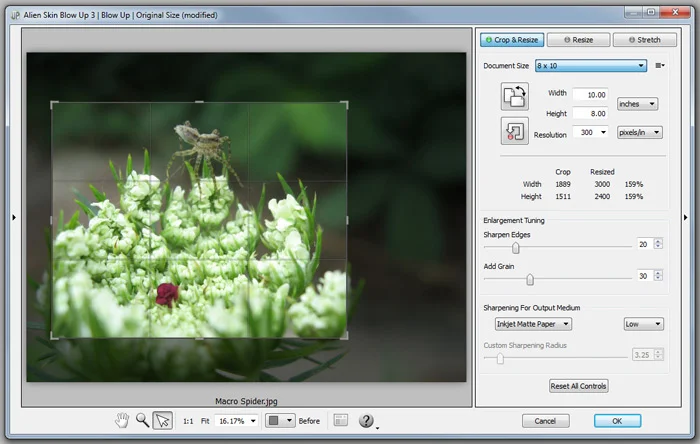
Blow Up keeps renderings crystal clear during enlargement. Especially in large prints hung on a wall, the difference between Blow Up and Photoshop is astounding. Version 3 makes renderings even sharper without computer artifacts.
If you understand Photoshop’s resize command, then you already know how to use Blow Up. Our large library of standard paper sizes makes it even easier. With Lightroom and CMYK support, Blow Up fits into a professional workflow.
Did you enjoy this article? I would love to hear your thoughts, so don’t be shy and comment below! Please don’t forget to subscribe to my RSS-feed or follow my feed on Twitter, Google+ and Facebook! If you enjoyed the following article we humbly ask you to comment, and help us spread the word! Or, if you would like, drop me an email.
Getting the Color Average
One of the most difficult parts of any architectural rendering is getting the colors correct. Typically, I receive a swatch, photo, or a web link. Now, people tend to see things as they remember them being. Our brains have a way to filter things out. For example, white snow is actually bluish, due to the sky, but our brains filter out the blue and shows us white because snow is white after all.

When I receive a color sample I crop out everything that isn't part of the material and I take an average sample. If I want snow to look real, I can't just apply a white material, because the snow isn't white; I have to create a bluish material.
In Photoshop go to Filter, Blur and select Average

Blur Average
Now, I can use Photoshop's Color Picker to get the average color and build my material from there.
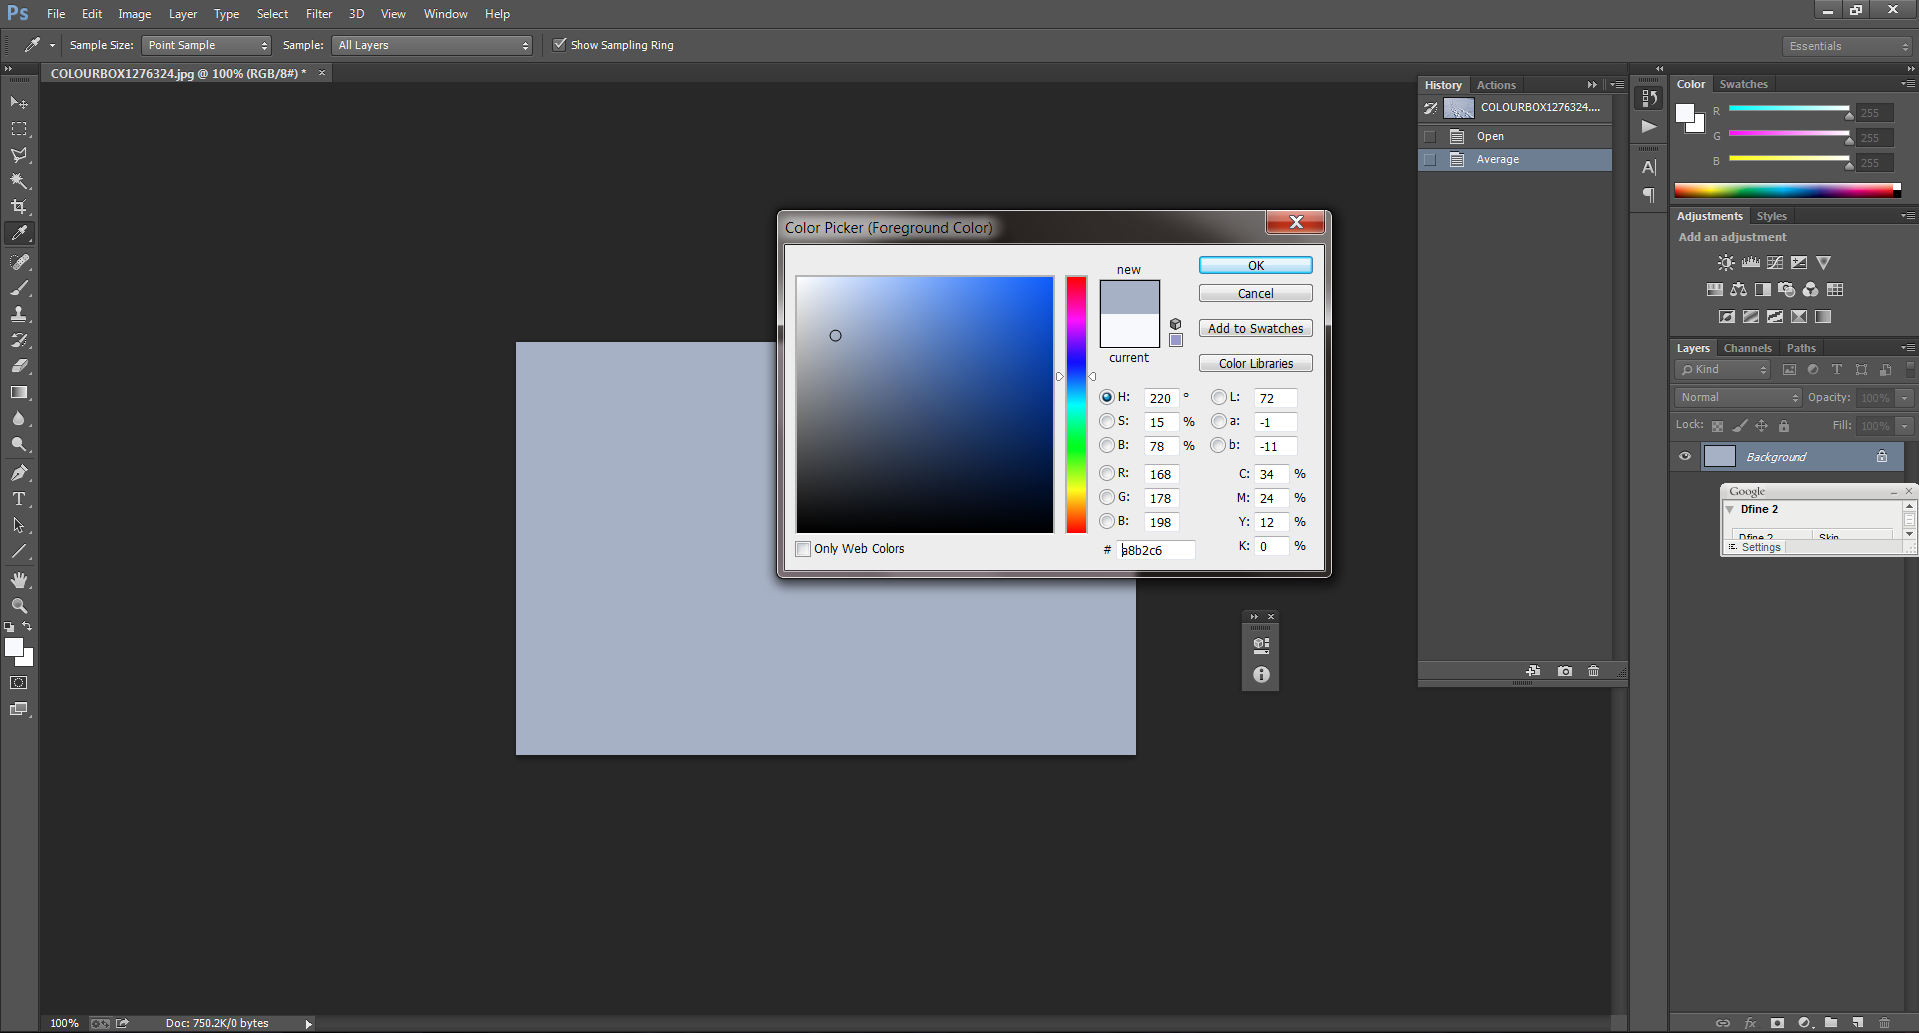
Photoshop Color Picker
I hope this helps you when you are creating your materials from a sample. If anything, you can show your client the actual color and not the color they think the sample is. I have had clients insist that a color is one thing, when in fact it is something totally different.
A photorealistic architectural rendering is only successful when you successfully recreate a reality. If you would like your snow scene to look real you'll have to make it blue.
Did you enjoy this article? I would love to hear your thoughts, so don’t be shy and comment below! Please don’t forget to subscribe to my RSS-feed or follow my feed on Twitter, Google+ and Facebook! If you enjoyed the following article we humbly ask you to comment, and help us spread the word! Or, if you would like, drop me an email.
Stix & Stones Pizza
Interior architectural renderings are both fun and challenging, which makes for an awesome project. Here, is a series of images I did for a Chicago Architect. Like all my work, comments, suggestions, and questions are not only welcome, they I encourage them.
Technical:
- 3DSMAX Design 2015
- V-Ray R2.5
- Photoshop CC 2014

Did you enjoy this article? I would love to hear your thoughts, so don’t be shy and comment below! Please don’t forget to subscribe to my RSS-feed or follow my feed on Twitter, Google+ and Facebook! If you enjoyed the following article we humbly ask you to comment, and help us spread the word! Or, if you would like, drop me an email.
Hyper-Realistic CGI Model of a Man
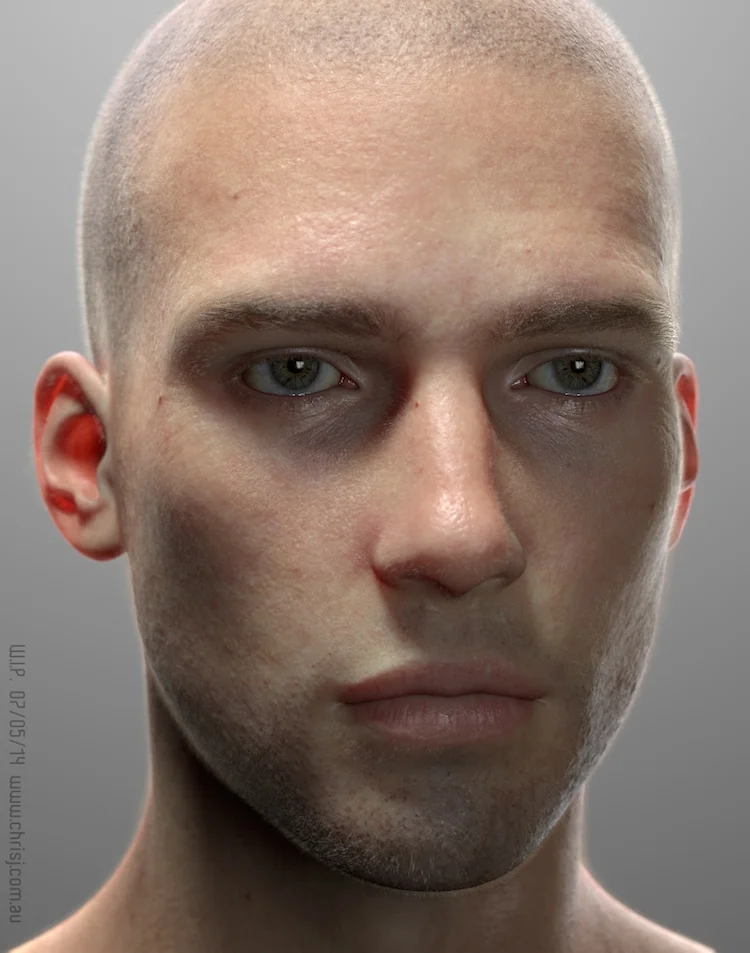
“Here’s something I just whipped up over the past decade. Well, I started it about a decade ago, but have been giving it some more attention recently.
I intend to continue refining and perfecting it indefinitely, for use as the basis for whatever humanoid characters I may need in the future. In this instance I’ve given him an Anatomy Tools inspired makeover as a detail test for my newly revised 3D workflow. It’s a bit rough in places – that’s what tests are all about.”
“Ed” is a hyper-realistic CGI model of a man created by artist Chris Jones that was built with Lightwave,Sculptris, and Krita software and composited with DaVinci Resolve Lite. Jones is keeping track of his progress and answering questions about the project on a NewTek forum, and has posted a few test videos showing his work so far including Ed’s eyeball, the area around Ed’s eyeball, and Ed’s face as a whole.
Did you enjoy this article? I would love to hear your thoughts, so don’t be shy and comment below! Please don’t forget to subscribe to my RSS-feed or follow my feed on Twitter, Google+ and Facebook! If you enjoyed the following article we humbly ask you to comment, and help us spread the word! Or, if you would like, drop me an email.
Mountain Retreat Architectural Rendering

Mountan Side Retreat Rendering

Poolside Mountain Retreat Rendering
“Wow!!! You never cease to amaze me! These look amazing.”
A wonderful home at the base of a mountain. It's a white craftsmen style home, which I was asked to illustrate.
Did you enjoy this article? I would love to hear your thoughts, so don’t be shy and comment below! Please don’t forget to subscribe to my RSS-feed or follow my feed on Twitter, Google+ and Facebook! If you enjoyed the following article we humbly ask you to comment, and help us spread the word! Or, if you would like, drop me an email.
Evermotion Editor's Choice
Editors’ Choice: Daily selection of works published in Evermotion Forum Galleries picked by Evermotion staff.

Editors’ Choice
Did you enjoy this article? I would love to hear your thoughts, so don’t be shy and comment below! Please don’t forget to subscribe to my RSS-feed or follow my feed on Twitter, Google+ and Facebook! If you enjoyed the following article we humbly ask you to comment, and help us spread the word! Or, if you would like, drop me an email.