

BLOG
Making of Audi Perfect Shadow
Making of Perfect Shadow directed by Fuse
Music : Roadgame by Kavinsky
Done in Maya.
Rendered with Vray and mental ray (just for dust particles and some volumetric lighting).
Compositing in nuke.
Editing and final compositing in after effects ( flares, light dust, camera aberrations).
Did you enjoy this blog post? If so, then why not:
Leave Comment | Subscribe To This Blog | Email Me
Which Square Is Darker?
Does this tricky “Gotcha” ruin the shading and colors in your drawings and paintings?
Hint: Look closely at these squares...

The answer is...
This is an optical illusion that you face in your drawings everyday. In fact, both squares are the exact same color.
Don't believe it? Drag that square above with the hole in the middle over the two squares and you can see for yourself.
It can be extremely difficult to see the change between values—and where there is no change in value, your image goes flat.
Did you enjoy this blog post? If so, then why not:
Leave Comment | Subscribe To This Blog | Email Me
Royalty Free HDRI Images
- Royalty free images
- License not transferable
- You Pay 0 for everything here
- Free for commercial and non-commercial usage
Notice!
You can't redistribute or share any files found here.
If You need it in your project You want to share, simply link to a product page on HDRMAPS.com.

Freebies
Did you enjoy this blog post? If so, then why not:
Leave Comment | Subscribe To This Blog | Email Me
Delivering Quality Work
There's no such thing as objectively good work. It's only good according to how well it fills a need. That theme permeates your drive to deliver quality work, and it's your client who determines that your work is quality. Here are some ways to not only do the work well, but to help them see that the work was done well. I take steps that follow the old saying tell them what you're going to do, then do it, then tell them what you just did. Or, in other words, confirm the task, deliver the goods, and review what happened.

Let's start with confirmation. It's not just a one time thing. You'll have to keep asserting your understanding throughout the project. Whenever you get new information from the client, confirm not only what it is, but how it will be incorporated into the project, and when they will see the results.
Then comes the second step which is the biggest: deliver the work. But there's more to it than that. The delivery has to fit their expectations according to the six traditional questions:
- Who?
- What?
- Why?
- When?
- Where?
- how?
First is who. Are you delivering the work to the right person? If you're not sure, confirm it. Next is what. Are you delivering what they asked for? This should be spelled out in your agreement. Then is why. Aside form what's in the agreement, does the product satisfy the reason you were hired in the first place? Is anything else needed to of your work truly useful? The questions of where, how, and when should also be answered in the agreement. Do they want a printed copy, a digital version, both, or something else? Does a physical object need to be delivered? The more your delivery matches their expectations, the more likely they will be satisfied and that they will look forward to hiring you again.
So that takes us through the confirm and deliver phases. Now for the review. Even if, all the work is done, you need to make sure that the client is satisfied. If they are, then give them the satisfaction of closure by letting them declare it done. If they're not satisfied, sincerely listen to their concerns and review the project's details. But let's assume that everything went well. While there's a good feeling between you, take this moment to ask them to memorialize that with an endorsement. That reminds them of how satisfied they were while also giving you a powerful tool for marketing your services to others.
Did you enjoy this blog post? If so, then why not:
Leave Comment | Subscribe To This Blog | Email Me
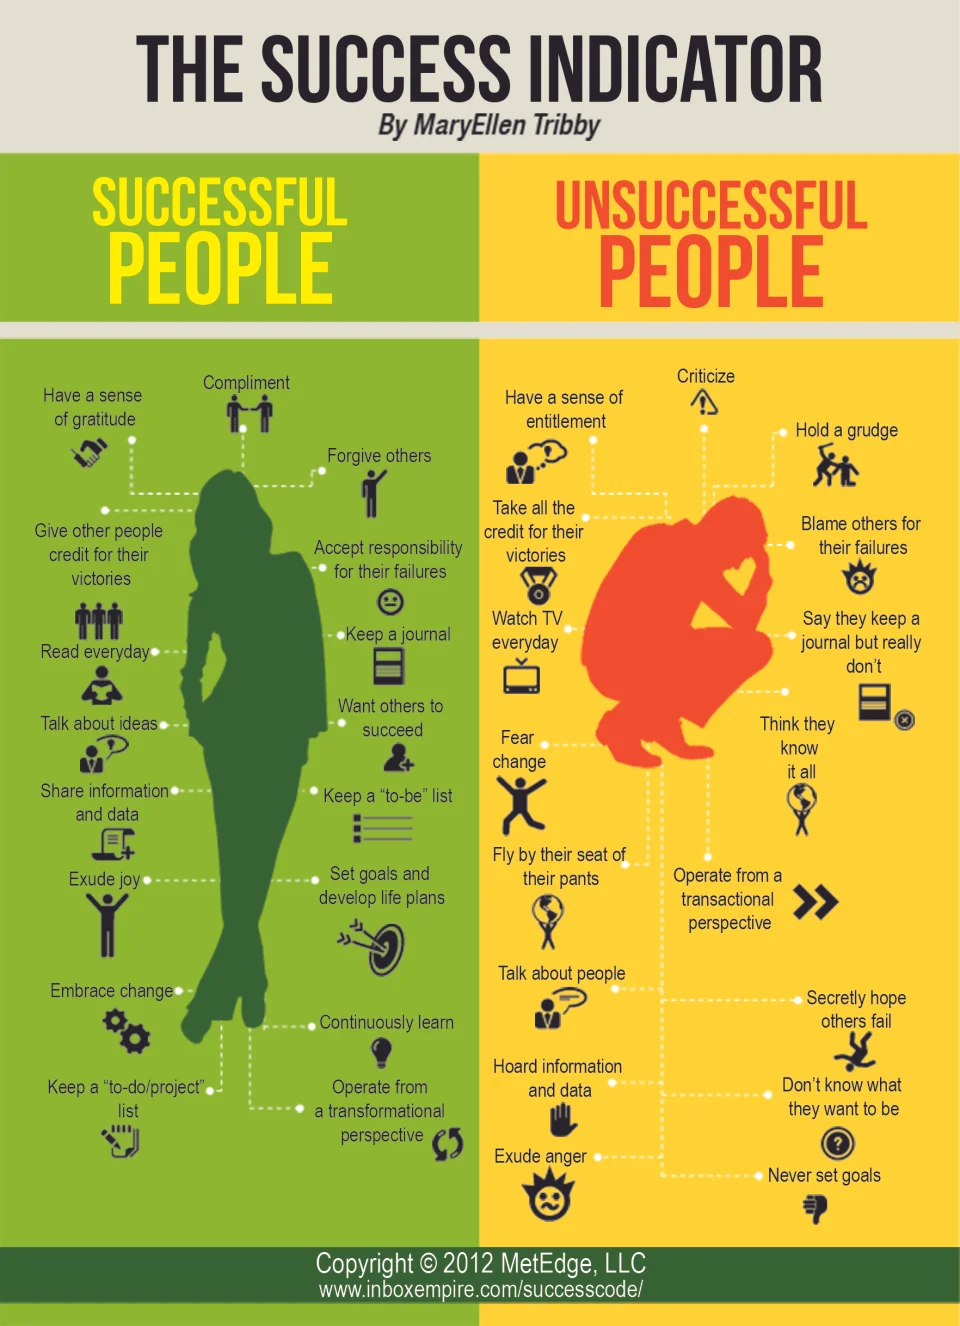
The Success Indicator
- Have a sense of gratitude
- Forgive others
- Accept responsibility for their failures
- Compliment
- Read everyday
- Keep a journal
- Talk about ideas
- Want others to succeed
- Share information and data
- Keep a "to-be" list
- Exude joy
- Keep a "to-do/project" list
- Set goals and develop life plans
- Embrace change
- Give other people credit for their victories
- Operate from a transformational perspective
- Have a sense of entitlement
- Hold a grudge
- Blame others for their failures
- Criticize
- Watch TV everyday
- Say they keep a journal but really don't
- Talk about people
- Secretly hope others fail
- Horde information and data
- Don't know what they want to be
- Exude anger
- Fly by their seat of their pants
- Never set goals
- Think they know it all
- Fear change
- Take all the credit of their victories
- Operate from a transactional perspective

Did you enjoy this blog post? If so, then why not:
Leave Comment | Subscribe To This Blog | Email Me
The Most Incredible Time-Lapse Video I’ve Ever Seen
This video was shot by photographer Dustin Farrell in Arizona and Utah (yay!). He said, “Every frame of this video is a raw still from a Canon 5D2 DSLR and processed with Adobe software. In Volume 2 I again show off my beautiful home state of Arizona and I also made several trips to Utah. This video has some iconic landmarks that we have seen before. I felt that showing them again with motion controlled HDR and/or night timelapse would be a new way to see old landmarks.”
In layman’s terms… he used a camera. Not a camcorder. A DSLR camera. And he put each individual picture together on a computer to make it into a video.
I’m blown away. I’m speechless. Some things are so powerful and so beautiful that to see them will turn your soul inside out. This certainly did it for me.
Thank you Dustin.
Dan Pearce, Single Dad Laughing
And please, share this with everybody. As a fellow and very inferior photographer, I can tell you that he deserves every view he gets. The time that must have gone into this is almost unimaginable.
What did you think as you watched this?
Did you enjoy this blog post? If so, then why not:
Leave Comment | Subscribe To This Blog | Email Me
Creating Colored Pencil Art? Claim this FREE Download!
Each of us come to art for different reasons. Some of the most common include the need to express ourselves and the desire to create memories of the things, people and places we experience. It’s freeing to be able to stop what you’re doing anywhere and sketch a scene or put a new idea to paper while it’s fresh in your mind. While painting is satisfying, carrying all the supplies you need on a daily basis takes planning and can be cumbersome. Color pencil drawing, on the other hand, keeps it simple. Paper, pencils, a sharpener and eraser are the basics that you need; all of which can easily fit in a backpack or satchel.
LEARN ABOUT COLORED PENCIL TECHNIQUES IN THIS FREE DOWNLOAD!

But this is just one reason that using colored pencils is attractive. Gary Greene, artist, contributor to The Artist’s Magazine and author of The Ultimate Guide to Colored Pencil, has this to add:
“Colored pencils are relatively inexpensive and the palette is extensive. The color is pure, clean and bright. The medium is permanent, and colored pencil drawings do not require elaborate care or storage. Along with hard and soft colored pencils, watercolor pencils and oil-based colored pencils offer more options for beginning artists.
“Colored pencil offers the pleasures and rewards of both drawing and painting. Whatever other medium you enjoy, you’ll find colored pencil a worthwhile addition to your repertoire.”~Gary Greene, from The Artist’s Magazine’s Mediapedia, July/August 2009
Colored Pencil Art 101
The process for using colored pencils isn’t as obvious as one may think. There are many colored pencil techniques—don’t start without knowing how to get the best results from your supplies. In Colored Pencil 101 (a free excerpt from The Ultimate Guide to Colored Pencil), you’ll learn how to use the two types of strokes that work best for colored pencil painting, how to follow contours to show the shape of a surface, how to gradually add color and how to keep your color from becoming contaminated. Greene shows you how to work from dark to light, create highlights, make adjustments and keep things as clean as possible to protect your final painting.
Plus, along with this free download from The Ultimate Guide to Colored Pencil, you’ll receive the free ArtistsNetwork.com newsletter with inspiration for painting with watercolor, oil, pastel, acrylic, and of course, colored pencil!
Colored Pencil Tutorial

In Colored Pencil 101, you’ll gain an understanding of how to use colored pencils and apply a variety of techniques to your own paper. Give yourself this helpful knowledge that will move you closer to getting the artistic results you want for your own drawings and paintings.
Colored Pencil Techniques

- Learn why it’s important to follow the contours of your subject’s shapes to give a realistic impression.
- Discover how to add color gradually so that you don’t lose the naturally translucent character of your colored pencils on the paper.
- Understand what it means to work from dark to light; an important concept that will determine the success of your work
Using Colored Pencils

At some point in any given painting, you’ll want to make adjustments. In this free download, Greene explains the difference between adjusting wax or oil-based colored pencil marks as opposed to adjusting water-soluble colored pencil marks, as well as what happens when you use a solvent.
Colored Pencil Drawings!

You didn’t pick up your colored pencils to get frustrated. Having the advice and knowing these tips from Colored Pencil Art 101 will ensure that your colored pencil experience will start out positive because you’ll have all the basic information you need to create a colored pencil painting, and you’ll enjoy the process along the way.
Claim this FREE Download!
Did you enjoy this blog post? If so, then why not:
Leave Comment | Subscribe To This Blog | Email Me
Invoicing and Getting Paid
Every experienced freelancer has a story about a client who doesn't pay or who is slow to pay. It's going to happen to you too, but there are a few ways to make such experiences less frequent.
Your first line of defense is your contract. You should include clauses that specify not only the amount the client will pay you, but also how and when. Along with the payment clause, have clauses that spell out precisely what the client is getting from you. That lays out your argument before it happens by saying, "I did A, B, and C as the contract specified." Now it's time to hold up your end of the bargain. But clauses are only as good as their enforcement, so it's important you have text in the contract that explains what will happen if you're not paid. It needs to be realistic, actionable and legal; and you have to be prepared to go through with it. For example, a common clause in the United States says that both parties will seek mediation or arbitration before going to court and it spells out the conditions.

You might ultimately decide it's not the worth the trouble to follow through, but again, someone is eventually going to try to get away without paying, so be prepared. Finally, don't start the work until the contract is signed or until you have other legal proof of agreement. This is the part that can be hardest because you'll be eager to get going. But it's important psychologically that the client acknowledge that the project is actually going to happen and that they will have to go through with their responsibilities. There is another way to make sure you get paid, and that's to take payment in advance, either partially or in full. I'm of two minds about this. On the one hand, requiring advance payment could hinder the sales process. You're essentially demanding that they trust you more than you trust them. On the other hand, they are going to have to pay you sometime, why not at the beginning. There is one situation where you should probably get payment upfront. If the job requires you to buy materials that are specific to the project or spend your own money to get it started, make sure the client covers those expenses first. In this area, you're just going to have to develop your own judgement and listen to the experiences of your colleagues.
So you have finished the work and now it's time to collect. As a reminder, you should present your client with an invoice. By the way, some accounting programs have their own invoicing function, including the popular QuickBooks. In any event, an invoice should include at least the following elements. Start with your contact information, then put the word INVOICE in big letters at the top of the page. That will help prevent it from being buried. Include a statement that you expect to be paid, how you should be paid and when the deadline for payment is. By the way, I'll often say something like, "In 45 days, but then I'll include the actual date." Then give a brief description of why you're getting paid. Here I'll often reference the agreement saying for example, In accordance with our contract of February the 15th. And of course, specify the amount you expect to be paid.
Some clients also like you to include an Invoice Number to help them track it in their records. And if it's for hourly work I'll paste my time sheet at the bottom of the page. Finally, send it off, make a note of the due date in your calendar and try to put it out of your mind. You can drive yourself crazy worrying whether someone is going to pay you, but remember until the deadline is passed there's nothing to be done. I found that most clients are pretty good about paying on time, especially after your first project together. Give them the benefit of the doubt, but then be prepared to act once the deadline is passed.
Did you enjoy this blog post? If so, then why not:
Leave Comment | Subscribe To This Blog | Email Me
Professionals Get Paid
A big distinction between amateurs and professionals is that professionals get paid for what they do. The first thing you'll need is a bank account for your business. I recommend you get one that's separate from your personal account. That makes bookkeeping easier and keeps you from having to give personal banking information to clients.

I found the simplest way to receive payments in the United States is to simply ask clients to send you a paper check, then deposit that in the normal way. However, you should also be prepared for electronic payments, particularly if you have clients outside your home country. Beyond traditional banks, you can also get paid through online payment systems such as PayPal. I found it to be great for smaller clients, but because it's not a real bank I do recommend that you sweep money from your PayPal account into your business bank account as soon as the money becomes available.
Although PayPal gives people a way to pay you with credit cards it's not as robust or as cheap as Merchant Card Systems. Those let you accept credit cards directly without PayPal as a mediator. Again, your bank can probably offer you such services or can refer you to somebody who can.
Whatever payment option you use, I recommend that you write it into your contract. For example, I might say, "Payment by check drawn on a United States Bank must be received by such and such date, payable to Bobby Parker" But it's also wise to ask the client how they prefer to pay and then make sure it's possible. After all, the more ways they can pay, the faster you'll get paid.
Did you enjoy this blog post? If so, then why not:
Leave Comment | Subscribe To This Blog | Email Me
Anyone Can Draw
“It is a child’s natural way to use art as a personal language. The child invents new ways to tell us about his ideas, impressions and feelings. This natural approach results in the exciting design which makes children’s art so vital...”
Did you enjoy this blog post? If so, then why not:
Leave Comment | Subscribe To This Blog | Email Me

Design Job & Career Salaries Infographic

Did you enjoy this blog post? If so, then why not:
Leave Comment | Subscribe To This Blog | Email Me
Setting Prices
One subject that provides freelancers a lot of anxiety is how to price their services. We want to make a good living, but are afraid of driving the market away by charging too much. So, What's the right amount?

Simply put, it's the area between charging too much and charging too little. Believe it or not, the bigger problem that freelancers face is that they charge too little. So, I'll talk about that first.
There are few reasons freelancers charge too little. If you're coming from a salary position where you did similar work, you might figure out your hourly rate there and charge private clients a similar amount. But that's way, way, way too low. First of all, you're not going to bill 40 hours a week. Another, You now have to cover expenses that your employer used to pay. One rule of thumb puts a typical freelance rate at two and a half times the hourly rate that freelancer would get with an employer. That's not always right, but the point is that your rates will be much higher per hour.
A second reason you might charge too little is that you can't believe someone would pay that much. But if you had never been on the buying side of the equation, you probably don't have a sense of how expensive good labor is. Talking to people in your professional network can help you figure out what the real market rates are. Or maybe you can believe someone would pay that much, but can't believe they would pay it to you. Assuming you have the skills that just basic insecurity talking. It's hard to get a sense of ones own value. Again, talk with colleagues and other professionals to determine what your realistic value is.
Some government bodies keep track of pay scales for various professions, and that gives you another data point.in the U.S., that's done by the Bureau of Labor Statistics. You can search for details on your profession in their Occupational Outlook Handbook at bls.gov/ooh.
The problem with charging too little isn't just financial. If you undercharge, prospective clients will see the low figure and suspect that you're just not very good. And established clients who have gotten used to your low rate will get spoiled wasting your time just because they can afford it. Higher rates make them value your time more leading to better work relationships and more fulfilling work. Now let's talk about charging too much. Basically, People buying your services have to justify the cost to themselves. It then comes down to a cost- benefit analysis for the buyer. The values are all pretty subjective, and they are not always easy for the buyer to measure in dollars, but they do perform such an analysis even if it's only in the back of their mind.\
If your rate is substantially higher than the cost of doing things internally or with another freelancer or not doing them at all, then you're out of a job. If you've gone through this whole process, you now have a reasonable understanding of what the market will bear. But there's one other factor; you have to make enough money to keep your business healthy. As with many other parts of freelancing, setting rates requires an understanding of your own value. It involves research and a certain amount of difficult soul-searching, but it can lead you to being able to charge your true value confidently and successfully.
Did you enjoy this blog post? If so, then why not:
Leave Comment | Subscribe To This Blog | Email Me
Up and Running with Office 365 (2011) with David Rivers
Get a thorough introduction to Microsoft's hosted collaboration and productivity suite. Author David Rivers tours the subscription service, showing how to administer user accounts; share Word, Excel, PowerPoint, and OneNote files with SharePoint; and manage mail, contacts, and calendars with the Outlook web app. The course also explains how to set up Office desktop apps to work with Office 365 and connect with colleagues using the Lync communication server.
Topics include:
- Choosing the right plan
- Defining and adding users
- Setting up a SharePoint team site
- Viewing and editing your web site
- Sending and receiving email
- Importing contacts into the Outlook web app
- Managing tasks
- Sending instant messages
- Conducting audio calls and online meetings
Up and Running with Office 365
Did you enjoy this blog post? If so, then why not:
Leave Comment | Subscribe To This Blog | Email Me
Pixar Animation Studios Open Subdivision Technology Review
Did you enjoy this blog post? If so, then why not:
Leave Comment | Subscribe To This Blog | Email Me
Scott Kelby Shows Hidden Gems in Photoshop
Did you enjoy this blog post? If so, then why not:
Leave Comment | Subscribe To This Blog | Email Me
Learn How To Use Your V-Ray Physical Camera
Play with the camera controls found in the "Creative Zone" of an EOS Digital SLR. Here, you can really dictate the outcome of your photos and get the effects you want. Your shots will appear below where you can review, get feedback and compare the settings you used.

Did you enjoy this blog post? If so, then why not:
Leave Comment | Subscribe To This Blog | Email Me
20 Factor Test – Independent Contractor or Employee?
The 20 factors used to evaluate right to control and the validity of independent contractor
classifications include:
- Level of instruction. If the company directs when, where, and how work is done, this control indicates a possible employment relationship.
- Amount of training. Requesting workers to undergo company-provided training suggests an employment relationship since the company is directing the methods by which work is accomplished.
- Degree of business integration. Workers whose services are integrated into business operations or significantly affect business success are likely to be considered employees.
- Extent of personal services. Companies that insist on a particular person performing the work assert a degree of control that suggests an employment relationship. In contrast, independent contractors typically are free to assign work to anyone.
- Control of assistants. If a company hires, supervises, and pays a worker's assistants, this control indicates a possible employment relationship. If the worker retains control over hiring, supervising, and paying helpers, this arrangement suggests an independent contractor relationship.
- Continuity of relationship. A continuous relationship between a company and a worker indicates a possible employment relationship. However, an independent contractor arrangement can involve an ongoing relationship for multiple, sequential projects.
- Flexibility of schedule. People whose hours or days of work are dictated by a company are apt to qualify as its employees.
- Demands for full-time work. Full-time work gives a company control over most of a person's time, which supports a finding of an employment relationship.
- Need for on-site services. Requiring someone to work on company premises—particularly if the work can be performed elsewhere—indicates a possible employment relationship.
- Sequence of work. If a company requires work to be performed in specific order or sequence, this control suggests an employment relationship.
- Requirements for reports. If a worker regularly must provide written or oral reports on the status of a project, this arrangement indicates a possible employment relationship.
- Method of payment. Hourly, weekly, or monthly pay schedules are characteristic of employment relationships, unless the payments simply are a convenient way of distributing a lump-sum fee. Payment on commission or project completion is more characteristic of independent contractor relationships.
- Payment of business or travel expenses. Independent contractors typically bear the cost of travel or business expenses, and most contractors set their fees high enough to cover these costs. Direct reimbursement of travel and other business costs by a company suggests an employment relationship.
- Provision of tools and materials. Workers who perform most of their work using company-provided equipment, tools, and materials are more likely to be considered employees. Work largely done using independently obtained supplies or tools supports an independent contractor finding.
- Investment in facilities. Independent contractors typically invest in and maintain their own work facilities. In contrast, most employees rely on their employer to provide work facilities.
- Realization of profit or loss. Workers who receive predetermined earnings and have little chance to realize significant profit or loss through their work generally are employees.
- Work for multiple companies. People who simultaneously provide services for several unrelated companies are likely to qualify as independent contractors. Availability to public. If a worker regularly makes services available to the general public, this supports an independent contractor determination.
- Control over discharge. A company's unilateral right to discharge a worker suggests an employment relationship. In contrast, a company's ability to terminate independent contractor relationships generally depends on contract terms.
- Right of termination. Most employees unilaterally can terminate their work for a company without liability. Independent contractors cannot terminate services without liability, except as allowed under their contracts.
Did you enjoy this blog post? If so, then why not:
Leave Comment | Subscribe To This Blog | Email Me
How Freelancing and Employment Differ
The I.R.S., that's the U.S. government's tax authority says that a freelancer is an independent contractor if the payer has the right to control or direct only the result of the work and not what will be done or how it will be done. In other words, the client could say, render my building and deliver the results as a Layered Photoshop File, and you'd still be considered a freelancer. But if the client says, "You must use 3D Studio MAX and do the work in our office between 9 AM and noon," then the I.R.S. is likely to consider you an employee rather than an independent contractor which would lead to differences in such things as tax withholding, benefits and so on. Such distinctions vary from country to country. In the U.S., the I.R.S. released some specifics that set forth 20 factors to separate employees from independent contractors. But on a day-to-day level, you'll be more affected by the practical differences. The big one is, if something needs doing, you're the one to do it, and there's nobody else to blame if it doesn't get done. You're now in charge of among other things, marketing, sales, accounting, project management, IT, and legal matters. You also have to keep yourself busy, and motivated. And if you expand by hiring other people, you have to become your own human resources department. If you think that's all daunting, well, you're right. Finally, we come to the personal differences between freelancing and employment. That is, how your mentality and lifestyle will change. For example, you're likely to find your work life creeping into your personal life and vice-versa. So it becomes much harder to judge whether you're being productive. And that can lead to some unexpected anxieties.

Freelance
Did you enjoy this blog post? If so, then why not:
Leave Comment | Subscribe To This Blog | Email Me
Great Texture Resources
Need a texture? Here is a list of sites that I use often, and can suggest to you as a sumptuous texture resource. If you have any additional references, please add to the list by adding a comment.

Texture Library Resources
Did you enjoy this blog post? If so, then why not:
Leave Comment | Subscribe To This Blog | Email Me
The Evolution of the 3D Industry Panel: Who will survive?
Did you enjoy this blog post? If so, then why not:
Leave Comment | Subscribe To This Blog | Email Me